Debugging: Finding and Fixing Mistakes

Look at this page from a computer logbook. That is a real moth, taped in on 9 September 1947 after engineers found it stuck inside the Harvard Mark II computer. Today we still call mistakes in programs “bugs”, and finding and fixing them “debugging”.

A yellowed logbook page with handwritten notes and times. A small moth is taped to the middle of the page next to the words “First actual case of bug being found”.
The moth found trapped in a relay of the Harvard Mark II computer on 9 September 1947, taped into the logbook with the note “First actual case of bug being found.” Engineers already used the word “bug” for faults, and this moth made the joke famous.

Image source: File:First Computer Bug, 1947.jpg (Wikimedia Commons)

In this post:

  • What bugs and debugging are, and why every programmer debugs
  • Common bugs in Scratch programs
  • A five-step method for finding and fixing bugs
  • Three buggy Scratch projects to fix, including a bug-hunt you can do in this page
  • Choosing good test data, a matching activity and a quiz

Bugs and debugging

A bug is a mistake in a program that stops it working the way it should. It might not run at all, it might crash, or (the sneakiest kind) it might run but give the wrong result. Debugging means finding the bug and fixing it. Before a program is used by other people, it must be prepared for execution: checked, tested and debugged so that it runs correctly every time.

Every programmer, even the best in the world, writes bugs. What makes a good programmer is being calm and organised about finding them.

Common bugs in Scratch

BugExampleFix
Missing blockThe sprite never goes back to the start because nobody told it to.Add the missing block in the right place.
Wrong ordersay [You win!] comes before the check for the winner.Drag the blocks into the right order.
Wrong numberchange x by 10 on the left arrow, so the sprite goes the wrong way.Change it to −10.
Wrong conditionmark > 50 when a mark of exactly 50 should pass.Use <mark > 50> or <mark = 50>.
Not resettingThe score carries on from the last game.set [score] to 0 when the green flag is clicked.
Wrong hat or wrong spriteA script never runs because it is on the wrong sprite or under the wrong hat block.Move the script to the right sprite, or change the hat.
Loop problemsSomething happens only once because it is not inside a forever loop, or a loop never ends.Put the check inside a loop, or fix the loop’s condition.

A five-step debugging method

  1. Run it and watch. What exactly happens?
  2. Compare. What should happen? Write down the difference.
  3. Find where it goes wrong. Read the script block by block. Click single blocks to see what they do. Add a say block to show a variable’s value, or a wait to slow things down.
  4. Fix one thing at a time. If you change five things at once, you will not know which one worked.
  5. Test again, with normal, boundary and invalid data (see below). A fix can sometimes break something else!

Debug it! Project 1

What should happen: every time you click the cat, it should go to its starting position, move forward twice to the end position and then come back to the start. What actually happens: click the cat a few times and see. Then click See inside, find the bug and fix it in your own copy (click Remix).

Scratch project: DebugMe 1 by kunge.

Hint: the script is when this sprite clicked, go to x: −100 y: 0, then wait 1, move 130, wait 1, move 130, wait 1. Which instruction is missing at the end?

Debug it! Project 2

What should happen: you move the cat up and down with the arrow keys to get hit by the tennis ball, and each hit should add 1 to # of hits. Play it and watch the counter carefully. Does one hit add exactly 1?

Scratch project: DebugMe 2 by kunge.

Hint: the ball’s script checks if touching Sprite1 inside a forever loop. The loop runs many times every second, and the ball is touching the cat for several of those checks as it glides past. How could you make it count each hit only once? (One idea: after change [# of hits] by 1, add wait until <not <touching Sprite1?>>.)

Bug hunt: the grade calculator

This project gives a grade for a subject mark. It looks fine at first. Try marks such as 90, 60, 45 and 20 in the real project, and then try 100.

Scratch project: Grade calulator by kunge.

Try it: test, find and fix the bug

The script below is the same as the project’s. Test lots of marks (especially the boundaries, such as 100, 76, 75, 50, 49, 40 and 39) and compare what the program says with what it should say. When you have found the bug, choose a fix and test again.

when green flag clicked
ask [What's the subject mark?] and wait
set [mark] to (answer)
if <<(mark) > 75> and <(mark) < 100>> then think [That's a grade A!]
if <<(mark) > 49> and <(mark) < 76>> then think [That's a grade B!]
if <<(mark) > 39> and <(mark) < 50>> then think [That's a grade C!]
if <(mark) < 40> then think [That's a grade D!]

The teacher’s rules: A = 76 to 100, B = 50 to 75, C = 40 to 49, D = 0 to 39.

Test mark:

MarkExpectedProgram saysOK?

Found the bug? Choose the fix:

Choosing test data

To prove a program works, don’t just try one “easy” value. Test three kinds of data. For a program that accepts marks from 0 to 100:

Kind of test dataWhat it isExamples
NormalOrdinary values the program should handle easily35, 62, 88
Boundary (extreme)Values right at the edges of a range, where bugs love to hide0, 100, and 49 and 50 for the pass mark
Invalid (erroneous)Values that should be rejected−5, 150, “abc”

Try it: sort the test data

A program accepts marks from 0 to 100, and 50 is the pass mark. Drag (or tap) each test value into the right box.

0
120
−3
31
72
100
49
50
ten

Normal

Boundary

Invalid

Watch: debugging in four steps

This video shows a simple step-by-step way to get rid of bugs in your code, with Scratch examples.

Video: How to Debug your Code in 4 Simple Steps! | Coding for Kids – STEM MC – https://www.youtube.com/watch?v=EWOYoQJrni4

Activity: match the bug to the fix

Try it: how would you fix it?

Choose the best fix for each bug.

The score does not go back to 0 when a new game starts
The sprite moves right when you press the left arrow
A mark of exactly 50 says “Fail”, but 50 should pass
The sprite checks for the edge once and then never again
Nothing happens when you press space
The cat says “You win!” before the race has even started

Group practical: debug a set of programs

In groups, take the programs from your review in the last post (or projects your teacher gives you) that did not work properly. For each one: describe the bug, explain its cause, fix it, and list the test data you used to prove it now works. Use a table like this:

ProgramWhat went wrongCauseFixTest data usedWorks now?

Self-check quiz

Click the best answer. You get feedback straight away; only your first click counts towards your score.

1. A bug is…

2. Debugging means…

3. Why should you fix one thing at a time?

4. For marks from 0 to 100, which is boundary test data?

5. In the grade calculator, why did a mark of 100 get no grade?

6. The score keeps going up by lots for one hit. A good fix is to…

Related posts on islandclass.org

For later, in Forms 4–5 (CSEC IT): these go deeper and are for when you reach CSEC Information Technology.

Next: This is the last post in the Forms 1–3 series. Well done! Next stop: CSEC Information Technology in Form 4.

Syllabus link: Forms 1–3 ICT curriculum, Module 5, Objective 5.18 – prepare a program for execution.

Attributions to media used in this post:

Updates

2026/10/21

– Fixed the activity code so its buttons keep working.

© 2026 Vedesh Kungebeharry. All rights reserved.
Scratch: Reading Code and Predicting Output

Before you click the green flag, can you look at a script and say exactly what it will do? Reading code like a computer is one of the most useful skills a programmer has. It helps you plan, spot mistakes and understand other people’s projects.

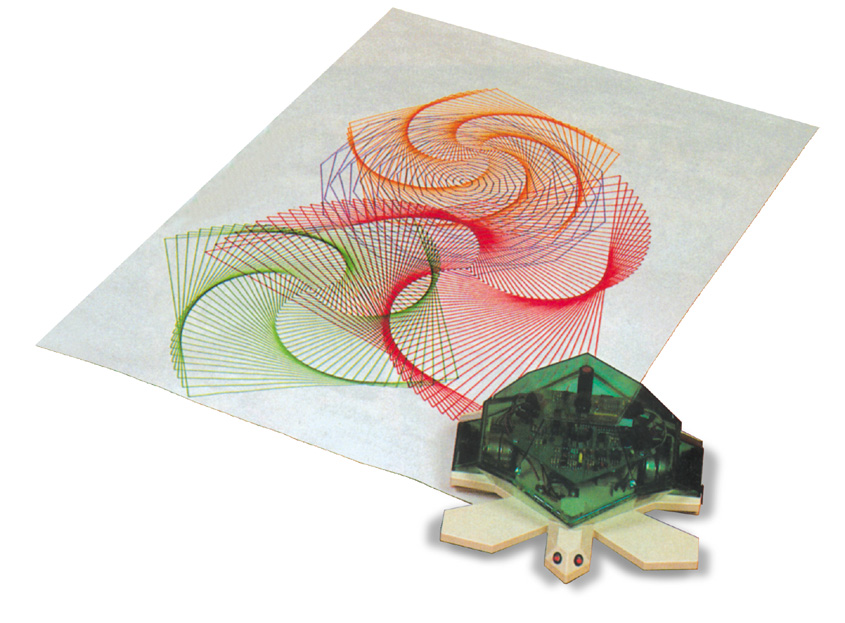
A small green and transparent robot turtle on a sheet of paper covered with colourful spiral patterns that it has drawn.
The Valiant Turtle, a floor robot first sold in 1983. It drew pictures with a pen as it moved, following instructions typed into a computer. Scratch’s Pen blocks work in a similar way: move, turn and repeat.

Image source: File:Turtle draw.jpg (Wikimedia Commons)

In this post:

  • The big programming concepts: sequence, loops, conditions, variables, coordination, operators and testing
  • How to read a script step by step
  • Predict, then run: eight scripts to test yourself on, plus two Scratch drawings
  • A concept-spotting activity, a group report and a quiz

The big ideas

ConceptWhat it meansIn Scratch
SequenceSteps run one after another, in order.Blocks snapped under each other
Looping (repetition)Steps are repeated.repeat 10, forever, repeat until
Conditions (selection)Steps run only if something is true.if … then, if … then … else
VariablesNamed stores for values that can change.set [score] to 0, change [score] by 1
CoordinationSprites and scripts work together at the right time.broadcast, when I receive, wait
OperatorsArithmetic (+ − * /), relational (> < =) and logic (and, or, not).The green Operators blocks
TestingRunning the program with different inputs to check it does what it should.Clicking the green flag again and again, with different answers

How to read a script

  1. Start at the hat block: what makes this script run? (Green flag? A key? A message?)
  2. Go down one block at a time, in order. Do not skip ahead.
  3. Keep a trace table on paper for every variable, and update it whenever a set or change block runs.
  4. For a loop, count the times round. Write down what changes each time.
  5. For a condition, work out whether it is true or false right now, then follow only that path.
  6. For a broadcast, find every when I receive script for that message.
  7. Finally, run it to check your prediction. If you were wrong, find the exact block where your thinking went off track.

Predict, then run: two drawings

Each project below uses the Pen. Read the description and predict the shape before you click the green flag.

Drawing Exercise 1: pen down, then repeat 4 [move 100 steps, turn ↻ 90 degrees].

Scratch project: Drawing Exercise 1 by kunge.

Drawing Exercise 2: pen down, then repeat 3 [move 100 steps, turn ↻ 120 degrees].

Scratch project: Drawing Exercise 2 by kunge.

Did you notice? In both, the number of repeats × the angle = 360°, one full turn, so the sprite ends where it started.

Activity: predict, then run

Try it: what will each script do?

Read each script carefully and choose your prediction. Then click Run it and check to see what really happens.

Script 1

when green flag clicked
pen down
repeat (6)
    move (60) steps
    turn ↻ (60) degrees

1. Predict: what will happen?

Script 2

when green flag clicked
pen down
repeat (4)
    move (100) steps
    turn ↻ (60) degrees

1. Predict: what will happen?

Script 3

when green flag clicked
set [score] to (0)
repeat (5)
    change [score] by (2)
say (score)

1. Predict: what will happen?

Script 4

when green flag clicked
set [x] to (7)
if <(x) > (5)> then
    say [Big]
else
    say [Small]

1. Predict: what will happen?

Script 5

when green flag clicked
ask [How old are you?] and wait
(you type 12)
say (join [Next year you will be ] ((answer) + (1)))

1. Predict: what will happen?

Script 6

when green flag clicked
set [total] to (0)
set [n] to (1)
repeat until <(n) > (4)>
    change [total] by (n)
    change [n] by (1)
say (total)

1. Predict: what will happen?

Script 7

when green flag clicked
set [mark] to (50)
if <<(mark) > (40)> and <(mark) < (50)>> then
    say [Grade C]
else
    say [Not a C]

1. Predict: what will happen?

Script 8

Cat:
when green flag clicked
say [Ready?] for (2) seconds
broadcast 

Dog:
when I receive 
say [Woof!] for (2) seconds

1. Predict: what will happen?

Watch: sequences, selections and loops

This short video explains three of the big ideas from this post: sequence, selection and loops.

Video: Computer Science Basics: Sequences, Selections, and Loops – LearnFree – https://www.youtube.com/watch?v=eSYeHlwDCNA

Activity: name the concept

Try it: which concept is this?

Choose the main programming concept used in each piece of a script.

repeat (10)
if <touching edge?> then
set [lives] to (3)
broadcast [StartGame]
(score) * (2)
<(age) > 12> and <(age) < 16>
three blocks that run one after the other
running a quiz with right, wrong and blank answers to check it works

Group task: review a program

Your teacher will give your group a few short Scratch programs (or choose projects from this course, such as Catch the Apples or the Pass Mark Demo). For each one:

  1. Read the scripts without running them. List the concepts used (sequence, loops, conditions, variables, coordination, operators).
  2. Predict what the program will do. Write your prediction down.
  3. Run it with at least three different inputs or ways of playing. Did it do what you predicted? Does it do what it is supposed to do?
  4. Write a short typed report: what each program does, the concepts it uses, how well they suit the job, and anything that went wrong.

Self-check quiz

Click the best answer. You get feedback straight away; only your first click counts towards your score.

1. Which concept is shown by blocks that run one after another, in order?

2. if <x > 5> then … else … is an example of…

3. A loop runs repeat (3) [change [n] by 5] and n starts at 1. What is n at the end?

4. Which blocks let sprites coordinate their actions?

5. >, < and = are called…

6. Why should you predict before you run a program?

Related posts on islandclass.org

There is no older post on islandclass.org on reading and predicting code yet, so this post is the main lesson. The Scratch posts before it (from “Scratch: Moving and Controlling Sprites” onwards) have plenty of projects to practise on.

For later, in Forms 4–5 (CSEC IT): these go deeper and are for when you reach CSEC Information Technology.

Next: Debugging: Finding and Fixing Mistakes

Syllabus link: Forms 1–3 ICT curriculum, Module 5, Objective 5.17 (this objective has no number in the curriculum; it comes between 5.16 and 5.18) – interpret various programming concepts.

Attributions to media used in this post:

Updates

2026/10/21

– Fixed the activity code so its buttons keep working.

© 2026 Vedesh Kungebeharry. All rights reserved.

Scratch: Building an Interactive Game

Look at this race track from above. Imagine it as a Scratch backdrop: a grey road, green grass and a finish line. Could you program a car that you steer with the arrow keys, that gets sent back if it drives onto the grass, and that tells you your lap time? By the end of this post, you can.

A satellite photo of a winding motor-racing circuit with grandstands and car parks, surrounded by fields.
A satellite view of the Circuit of the Americas, a Formula One race track in Texas, USA. From above, a race track looks a lot like a game backdrop.

Image source: File:Circuit of the Americas, April 22, 2018 SkySat (cropped2).jpg (Wikimedia Commons)

In this post:

  • How a keyboard controls a game
  • Four new tools: the timer, reset timer, touching colour and sounds
  • Step-by-step plan for a car racing game
  • Play a car racing game in this post and see its scripts light up
  • Group project checklist, a matching activity and a quiz

Brainstorm: keys that control games

With your group, list games you know and the keys they use. Common choices: arrow keys to move or steer, W A S D for a second player, space to jump or shoot. For a racing game, the up arrow could move forward and the left and right arrows could turn. What should happen when the car leaves the road? How will the player know their time?

New tools for games

BlockCategoryWhat it does
timerSensingCounts the seconds since the project started or since it was last reset. Tick it to show it on the stage.
reset timerSensingSets the timer back to 0, for example when a race starts.
touching color [ ]?SensingTrue when the sprite touches that colour. Click the colour box, then use the dropper to pick a colour from the stage.
start sound [ ] / play sound [ ] until doneSoundPlays a sound. start sound lets the script carry on at once; play sound until done waits until the sound finishes.

Plan: a car racing game

Step 1 – Backdrop: paint a track. Make the road one colour (grey) and everything off the road another colour (green grass). Add a finish line across the road as a separate, thin sprite.

Step 2 – Car sprite: paint a small car from above, or choose one from the library. Make it point to the right in its costume so that direction 90 means “forward”.

Step 3 – Steering: the up arrow moves forward and the left and right arrows turn:

when [up arrow] key pressed
    move (10) steps
when [right arrow] key pressed
    turn ↻ (15) degrees
when [left arrow] key pressed
    turn ↺ (15) degrees

Step 4 – Off the track: when the car touches green, send it back to the start and play a crash sound:

when green flag clicked
go to x: (start x) y: (start y)
point in direction (90)
forever
    if <touching color [green]?> then
        start sound [crash]
        go to x: (start x) y: (start y)

Step 5 – Timing: reset the timer at the start and show the time at the finish line:

when green flag clicked
reset timer
forever
    if <touching [Finish line]?> then
        say (join [Your time: ] (timer)) for (2) seconds
        stop [all]

Step 6 – Sounds: add a sound when the race starts, when the car crashes and when it finishes.

Step 7 – Instructions and game over: have a sprite say the instructions at the start. Decide when the game ends: when the car finishes, or when the timer passes a time limit.

Be careful: if the finish line is touching the car at the start, the game will end straight away! Put the car just behind the line, or only check the finish line after the car has driven part of the way round (a variable such as halfway can help).

Activity: race!

Try it: drive one lap

Click the green flag button, then click the track and drive with the arrow keys (or hold the on-screen buttons). The scripts on the right light up when they run. Can you get round without touching the grass? What is your best time?

Scripts running now

when [up arrow] key pressed
    move (10) steps
when [right arrow] key pressed
    turn ↻ (15) degrees
when [left arrow] key pressed
    turn ↺ (15) degrees
forever
  if <touching color [green]?> then
    start sound [crash]
    go to x: (start) y: (start)
if <touching [Finish line]?> then
    say (join [Your time: ] (timer))

timer: 0.0

This game was written in JavaScript so it can run inside this page, but it follows exactly the same plan as the Scratch scripts above: keys move and turn the car, a forever check on the colour under the car sends it back to the start, and the timer is reported at the finish line.

Watch: make a race game in Scratch

This tutorial walks through building a race game in Scratch. Pause it often and build along with it.

Video: How to Make a Race Game in Scratch [15 Min Tutorial] – CodeSpeak Labs – https://www.youtube.com/watch?v=tFQkv1GJsoc

Activity: which block does the job?

Try it: match the job to the block

Choose the block you would use for each job in the racing game.

Send the car back when it drives onto the grass
Start counting the seconds again when the race begins
Make a crash noise
Show how long the lap took
Turn the car when the right arrow is pressed
Move the car forward

Group project: build your racing game

In groups, build your own racing game in Scratch (or another interactive game controlled by the keyboard). Use this checklist to test each other’s games:

FeatureDone?
The car moves forward and turns using the keyboard
Touching the off-track colour sends the car back to the start
The timer resets at the start of the race
The time is shown when the car reaches the finish line
At least two sounds are used (start, crash or finish)
Instructions appear at the start
The game ends properly (finish line or time limit)
Sprites and backdrops have clear names

Extension: duplicate the car for a second player, using W, A and D, and see who finishes first.

Self-check quiz

Click the best answer. You get feedback straight away; only your first click counts towards your score.

1. Which block sets the timer back to 0?

2. Which block can tell when the car drives onto the green grass?

3. Why does the touching-colour check go inside a forever loop?

4. What is the difference between start sound and play sound until done?

5. Which block shows the time at the finish?

6. The game ends as soon as it starts. What is the most likely problem?

Related posts on islandclass.org

Next: Scratch: Reading Code and Predicting Output

Syllabus link: Forms 1–3 ICT curriculum, Module 5, Objective 5.16 – develop interactive games.

Attributions to media used in this post:

Updates

2026/10/21

– Fixed the activity code so its buttons keep working.

© 2026 Vedesh Kungebeharry. All rights reserved.

Scratch: Asking Questions and Using Variables

What if your program could ask you a question, remember your answer and then decide what to do with it? Type in a mark, and Scratch tells you whether it is a pass. Type in an angle, and a spaceship flies that way. That is input from the keyboard, and it is what makes programs truly interactive.

The Scratch 3 editor with block categories and Sound blocks on the left, a short script in the middle, and a stage with a green dinosaur sprite on the right above the sprite list.
The Scratch 3 editor. The ask and answer blocks are in the light-blue Sensing category, the variable blocks are in the orange Variables category, and join and the maths blocks are in the green Operators category, all in the list on the left.

Image source: File:Scratch 3.0 editor.png (Wikimedia Commons)

In this post:

  • Asking questions with ask and wait and using the answer
  • Variables: what they are, how to make one, number and text values, set and change
  • Operators: join, maths, comparisons and and/or/not
  • Making choices with if, if-else and repeat until
  • A pass-mark simulator, three Scratch projects including a space game, and a quiz

Asking a question

ask [What’s your name?] and wait (Sensing) makes the sprite ask the question and shows a box for typing. The program waits until you press Enter. Whatever you typed is stored in the answer block, which you can then use anywhere, for example say (answer). The Sensing category also has touching [ ]?, which checks whether the sprite is touching another sprite, the edge or the mouse.

Stuck on a block? Right-click it and choose Help (or open the Tutorials button at the top of the editor) for an explanation and examples.

Variables

A variable is a named store in the computer’s memory that holds one value, which can change while the program runs. Think of a labelled box: the label is the name (score), and what is inside is the value (7). The answer block changes every time someone answers a new question, so it is smart to copy it into your own variable straight away.

How to…Do this
Make a variableClick the Variables category → Make a Variable, type a clear name (e.g. mark) and choose For all sprites or For this sprite only.
Give it a valueset [mark] to (answer). Also use set at the start of a game, e.g. set [score] to 0.
Add to itchange [score] by 1 (use −1 to subtract).
Show or hide itTick the box next to it to show its value on the stage, or use show variable / hide variable.

Variables can hold numbers (like 72 or 3.5) or strings (text, like Ravi or Grade A). Scratch works out which is which for you, but you should still know the difference: you can do maths with numbers, but not with names!

Operators (green)

TypeBlocksExample → result
Join (text)join [ ] [ ]join (answer) [ Is a pass!] → “72 Is a pass!”
Maths+ − * /(score) * 2, (total) / 5
Comparison (relational)> < =(mark) > 50 is true when the mark is 72
Logicand, or, not<(mark) > 50> or <(mark) = 50> is true for 50 and above
Scratch has no ≥ block. To check “50 or more”, combine two conditions with or: <(mark) > 50> or <(mark) = 50>. Or use not <(mark) < 50>.

Making choices: if, if-else and repeat until

  • if <condition> then runs the blocks inside only when the condition is true.
  • if <condition> then … else … runs the first set of blocks when it is true and the second set when it is false. This is the flowchart decision diamond in Scratch!
  • repeat until <condition> keeps repeating the blocks inside until the condition becomes true, for example repeat until <touching edge?>.

Explore: is it a pass?

This project asks for a mark, then uses if-else with an or condition and the join block to say whether it is a pass. Try it below, then try the simulator underneath, which uses exactly the same script.

Scratch project: Pass Mark Demo (2026-05-06) by kunge.

Try it: test the pass-mark program

Click the green flag, type a mark and press Enter. Test a pass, a fail and exactly 50.

when green flag clicked
ask [Please enter a mark] and wait
if <<(answer) > 50> or <(answer) = 50>> then
    say (join (answer) [ Is a pass!]) for 10 seconds
else
    say (join (answer) [ Is a fail !]) for 10 seconds
end

…

🐱

answer = (empty)

The next version goes further. A variable called numMarks counts how many marks have been entered (change [numMarks] by 1 each time), and a forever loop keeps asking for marks. A second variable, speedFactor, controls how many seconds each speech bubble stays up, so changing one number changes the speed of the whole program.

Scratch project: Pass Or Fail – Upgraded (infinite repetition, using variables) by kunge.

Challenge: the space game

Here is a bigger project to explore, built for a classic programming challenge: steer a spaceship to a planet by typing an angle. Click the green flag. The score (Planets Destroyed) is set to 0 and the planet and rocket move to random places. Then the rocket asks you to Set bearing to …. A bearing is an angle measured like a compass: 0 is straight up, 90 is right, 180 is down and 270 is left. Your answer is stored in the variable bearing, and the rocket flies in that direction until it touches the edge. If it touches the planet on the way, the score goes up by 1 and the planet explodes; if not, the rocket says “I’ve Failed” and the score goes back to 0.

Scratch project: Planet destroyer by kunge.

Look inside to find: a set block for the score, ask and wait, a variable set to the answer, repeat until <touching edge?>, an if with touching Planet2?, and broadcasts (initialization, done moving, Start Game, Destroy Planet) that coordinate the two sprites.

Watch: the ask block and variables

This tutorial shows how to use the ask block and explains why we store answers in variables.

Video: How to use “ask” block and why we need variables – Scratch Tutorial – Hardy Code Lesson – https://www.youtube.com/watch?v=6prWODHL0Ts

Activity: true or false?

Try it: is the condition true or false?

Work out whether each condition is true or false for the value given.

(mark) > 50 when mark = 50
(mark) = 50 when mark = 50
<(mark) > 50> or <(mark) = 50> when mark = 50
<(age) > 11> and <(age) < 15> when age = 13
<(age) > 11> and <(age) < 15> when age = 16
not <(score) < 10> when score = 4
(answer) = [Paris] when the answer typed is Paris

Your challenge

  • Make a quiz sprite that asks three questions, keeps a score variable, and says “You got (score) out of 3” at the end using join.
  • Make a sprite ask “What is 7 × 8?” and repeat until the answer is 56, saying “Try again!” after each wrong answer.
  • In groups of three or four: remix the space game to add a lives variable, so a player has three tries before the game is over. Present your solution to the class.

Self-check quiz

Click the best answer. You get feedback straight away; only your first click counts towards your score.

1. Where is the text you type after an ask and wait block stored?

2. A variable is…

3. Which block gives a variable a value, such as 0 at the start of a game?

4. What does join [Hello ] (answer) give if the answer is Asha?

5. Which condition is true for a mark of 50 or more?

6. What does repeat until <touching edge?> do?

Related posts on islandclass.org

For later, in Forms 4–5 (CSEC IT): these go deeper and are for when you reach CSEC Information Technology.

Next: Scratch: Building an Interactive Game

Syllabus link: Forms 1–3 ICT curriculum, Module 5, Objective 5.15 – develop a program that accepts input from the keyboard.

Attributions to media used in this post:

Updates

2026/10/21

– Fixed the activity code so its buttons keep working.

© 2026 Vedesh Kungebeharry. All rights reserved.

Scratch: Coordinates and Broadcast in an Animation

In Maths, you plot points like (2, 3) on a grid. Did you know the Scratch stage is a grid too? Every sprite has an x and a y, and once you know them, you can send a sprite to any spot you like. Add messages that let sprites talk to each other, and you can make a two-player game.

A coordinate grid with x and y axes crossing at the origin (0,0), with the points (2,3), (−3,1) and (−1.5,−2.5) plotted in different colours.
A coordinate grid from Maths. The point (2, 3) is 2 to the right of the centre and 3 up. The Scratch stage works the same way.

Image source: File:Cartesian-coordinate-system.svg (Wikimedia Commons)

In this post:

  • Coordinates on the Scratch stage, and directions
  • Forever loops that run for the whole game
  • Broadcast and receive: how sprites send each other messages
  • Exploring a two-player catch game and a broadcast animation
  • A coordinate challenge, an ordering activity, a game plan and a quiz

The Scratch stage is a grid

The stage is 480 steps wide and 360 steps tall. The centre is (0, 0).

Place on the stagexy
Centre00
Right edge240–
Left edge−240–
Top edge–180
Bottom edge–−180
Top-right corner240180
Bottom-left corner−240−180
  • x tells you how far left or right: bigger x means further right; negative x is left of centre.
  • y tells you how far up or down: bigger y means higher; negative y is below the centre.
  • Click a sprite and look under the stage: Scratch shows its x and y. In the Motion blocks, go to x: y: and glide already contain the sprite’s current position.

Directions: point in direction uses angles: 90 = right, −90 = left, 0 = up and 180 = down. move 10 steps then moves the sprite the way it is pointing.

Activity: catch the star

Try it: use coordinates to reach the star

Move your mouse over the stage to see its x and y, just like in Scratch. Find the star’s coordinates, type them into the block and click Run the block. Try glide too!

-200-100100200-150-100100150

Mouse: x: – y: –

x: y:

Forever loops

A forever loop repeats the blocks inside it until the red stop sign is clicked. Games use forever loops for things that must keep happening all game long: checking the keys, moving enemies, checking whether something was caught. A forever loop with no condition inside simply keeps doing its job, for example forever: move 10 steps, if on edge, bounce.

Broadcast and receive

Sprites cannot see each other’s scripts. To work together, they send messages:

  • broadcast [StartGame] sends a message to every sprite and the stage.
  • when I receive [StartGame] is a hat block. The script under it runs when that message arrives.
  • broadcast [message] and wait waits until all the receiving scripts have finished before going on.

This is how you coordinate sprites, so they act at the right time, like actors who come on stage when they hear their cue.

Explore: Catch the Apples

This two-player game was made for a Form 3 class. Click the green flag, then press space to start. The cat moves with the left and right arrow keys and the dog moves with A and D. Catch as many falling apples as you can!

Scratch project: (C59) Catch the Apples by kunge.

Here is how the sprites work together:

SpriteWhat its scripts do
Apple (when the green flag is clicked)Sets Cat’s Score and Dog’s Score to 0, says “Catch the falling apples, press space to start.” and then uses a forever loop to check for the space key. When space is pressed, it broadcasts StartGame.
Cat and DogEach has a forever loop that checks its keys and changes x by 10 or −10. When they receive StartGame, the cat says “Lets Go! Meow” and the dog says “Arf! Apples!”.
Apple (when it receives StartGame)Hides itself, then, forever, makes a clone (a copy) of itself every 0.6 seconds.
Each apple cloneAppears at a random x with y = 120 (near the top), then keeps changing y by −10 until it touches the edge, the dog or the cat. If it touched the cat, Cat’s Score goes up by 1; if it touched the dog, Dog’s Score goes up by 1. Then the clone deletes itself.

Notice the coordinates: go to x: (pick random −180 to 180) y: 120 drops each apple at a different place across the top, and change y by −10 makes it fall.

Explore: a broadcast animation

In this short animation, the green flag script sends one message, Start animation. Two scripts receive it and run at the same time: one glides the cat from (−191, −131) to (194, −129) in 2 seconds, while the other switches costumes every 0.1 seconds until the cat’s x is bigger than 193. Together, they make the cat walk across the stage.

Scratch project: Sprite Animation 3 – Walk and glide by kunge.

Watch: broadcast blocks

This video shows how to use broadcast blocks to make sprites hold a conversation, instead of using lots of wait blocks.

Video: Scratch – How To Use Broadcast Blocks – mrGcoding – https://www.youtube.com/watch?v=0ZHalwPO1og

Activity: what happens first?

Try it: put Catch the Apples in order

Put these events in the order they happen, then click Check.

▲ First

  1. The green flag is clicked and both scores are set to 0
  2. The apple says “Catch the falling apples, press space to start.”
  3. A player presses space and the apple broadcasts StartGame
  4. The cat and dog receive StartGame and speak
  5. The apple hides and starts making clones
  6. A clone falls until it touches the cat, the dog or the edge
  7. The right score goes up by 1 and the clone is deleted

▼ Last

Group task: plan a two-player game

In pairs, plan a simple game that two people can play on one keyboard, for example a football passing game or a race to collect coins. Before you build it, write:

  1. The sprites, and which keys control each one.
  2. The starting position (x, y) and direction of every sprite.
  3. Which forever loops you need.
  4. The messages you will broadcast (for example StartGame, Goal, GameOver) and which sprites receive each one.
  5. How the game ends.

Then build it in Scratch and share it with your class.

Self-check quiz

Click the best answer. You get feedback straight away; only your first click counts towards your score.

1. What are the coordinates of the centre of the Scratch stage?

2. A sprite is at x: 200 y: 0. Where is it?

3. Which direction is point in direction 0?

4. What does broadcast [StartGame] do?

5. In Catch the Apples, what makes each apple fall?

6. What is a forever loop useful for in a game?

Related posts on islandclass.org

Next: Scratch: Asking Questions and Using Variables

Syllabus link: Forms 1–3 ICT curriculum, Module 5, Objective 5.14 – develop a simple animated game that coordinates the action of various sprites.

Attributions to media used in this post:

Updates

2026/10/21

– Fixed the activity code so its buttons keep working.

© 2026 Vedesh Kungebeharry. All rights reserved.

Scratch: Moving and Controlling Sprites

In almost every computer game, you press a key and something happens: a character runs, jumps, talks or changes colour. What is going on behind the screen when you press that key? A tiny script is listening for it. Today you will build those scripts.

Close-up of the four arrow keys on a grey computer keyboard: up, down, left and right.
The four arrow keys. Many games use them to move a character.

Image source: File:Arrow keys.jpg (Wikimedia Commons)

In this post:

  • Moving a sprite: steps, x and y, go to, glide and following the mouse
  • Controlling a sprite with the keyboard, two different ways
  • Making a sprite talk, change colour and animate
  • Three Scratch projects to explore, a keyboard-controls activity and a quiz

Ways to move a sprite

Block (Motion, blue)What it does
move 10 stepsMoves forward in the direction the sprite is facing.
change x by 10 / change y by 10Moves right (or up). Use −10 to go left (or down).
go to x: 0 y: 0Jumps instantly to that position.
glide 1 secs to x: 100 y: 50Slides smoothly to that position, taking the time you set.
go to random position / go to mouse-pointerJumps to a random spot, or to wherever the mouse is.
turn ↻ 15 degrees / point in direction 90Turns the sprite, or makes it face a direction.

The project below shows the difference between go to and glide. Click the green flag and watch: the cat jumps instantly to one spot, then glides to another, visits two random positions, glides after your mouse ten times, and finally follows your mouse forever. Then click See inside on the Scratch website to read the script.

Scratch project: 03 Moving and Gliding by kunge.

Controlling a sprite with the keyboard

There are two common ways to make keys control a sprite:

Way 1: when key pressed hatsWay 2: forever + if key pressed?
when [right arrow] key pressed
  change x by 10
when green flag clicked
forever
  if <key [right arrow] pressed?> then
    change x by 10
Easy to build. There is a short pause before a held-down key starts repeating, so movement can feel jerky.Checks the key many times every second, so movement is smooth, and several keys can work at once. Most games use this way.

This project uses Way 2. Press D and A to walk right and left (each step also switches costume, so the legs move), and the space bar to jump. The jump is a repeat 10 loop that changes y by 10, a short wait, then another loop that changes y by −10. Click the stage first so it can “hear” your keys.

Scratch project: Jumping Character copy by kunge.

Close-up of a laptop keyboard where the W, A, S and D keys are see-through and lighter than the dark keys around them.
The W, A, S and D keys are often used instead of the arrow keys, for up, left, down and right. Two players can share one keyboard: one uses the arrows, the other uses WASD.

Image source: File:ASUS ROG Strix G15 (G513QY-HQ012T)-top keyboard WASD PNr°0888.jpg (Wikimedia Commons)

Talking, colours and animation

  • Talking sprites: say Hello! for 2 seconds shows a speech bubble; think Hmm… shows a thought bubble (Looks blocks).
  • Changing colour: set color effect to 50 or change color effect by 25. clear graphic effects puts it back to normal.
  • Animating: next costume inside a loop with a short wait makes a flip-book animation (you did this in Form 2).
  • Following the mouse: forever + go to mouse-pointer, or point towards mouse-pointer + move 5 steps to chase it.
  • Interactive sprites: when this sprite clicked runs a script when someone clicks the sprite.

In this project, both sprites wait 1 second, then set color effect to 75, wait, change it to 165, wait, then to 5. Click the green flag and watch the colours change:

Scratch project: 01 Changing a sprite’s Colour 02 by kunge.

A first look at variables and if

Games often keep score. A variable is a named store for a value, such as jumps. Make one in the orange Variables category, then use set jumps to 0 when the green flag is clicked and change jumps by 1 each time the sprite jumps. An if … then block (Control) runs blocks only when its condition is true, for example if <touching edge?> then say Ouch!. You will use both a lot more in the next posts.

Activity: program the keys

Try it: make the arrow keys work

Choose a block for each script so the arrow keys move the cat the way a player expects, and the space bar makes it say Hello. Then click the stage and test with your keyboard, or use the buttons.

when [up arrow] key pressed
when [down arrow] key pressed
when [left arrow] key pressed
when [right arrow] key pressed
when [space] key pressed

Click the stage, then press the keys on your keyboard, or use these buttons:

x: 0 y: 0

Watch: make a jumping game

In this tutorial from the Scratch Team, a character jumps over moving obstacles to score points. It uses keyboard control, a loop for the jump and a score variable.

Video: How to Make a Jumping Game in Scratch | Tutorial – Scratch Team – https://www.youtube.com/watch?v=1jHvXakt1qw

Activity: what will the block do?

Try it: match the block to what happens

Choose what each block makes the sprite do.

go to x: 0 y: 0
glide 2 secs to x: 200 y: 0
change y by -10
forever: go to mouse-pointer
set color effect to 100
say Hi! for 2 seconds
next costume

Your challenge

  • Make a sprite move with the arrow keys using Way 2 (forever + if), and make it say “Ouch!” when it touches the edge.
  • Add a second sprite that is controlled with W, A, S and D.
  • When the green flag is clicked, make both sprites go to their starting positions and change colour.
  • Bonus: add a jump on the space bar and a variable that counts the jumps.

Self-check quiz

Click the best answer. You get feedback straight away; only your first click counts towards your score.

1. Which block moves a sprite smoothly to a spot?

2. To move a sprite left, you could use…

3. Why do most games use forever + if key pressed? to move sprites?

4. Which block makes a sprite follow the mouse all the time?

5. Which category has the say block?

6. What does set color effect to 75 do?

Related posts on islandclass.org

Next: Scratch: Coordinates and Broadcast in an Animation

Syllabus link: Forms 1–3 ICT curriculum, Module 5, Objective 5.13 – manipulate sprites using an application.

Attributions to media used in this post:

Updates

2026/10/21

– Fixed the activity code so its buttons keep working.

© 2026 Vedesh Kungebeharry. All rights reserved.

Flowcharts: Repeating Steps with Loops

Your teacher asks you to write out the 7 times table, from 7 × 1 to 7 × 12. That is twelve almost identical lines. Is there a way to write the step once and tell the computer to repeat it?

In this post:

  • What a loop (repetition) is and why it saves work
  • Counters: how a loop knows when to stop
  • Two flowcharts you can run: a times table and the average of five numbers
  • Tracing a loop, a quiz and your own loop flowchart

Loops: doing it again

A loop repeats a group of steps. Instead of drawing the same symbols twelve times, you draw them once and add an arrow that goes back up, so the steps run again. A decision checks each time whether to go round again or to leave the loop. Without that check, the loop would never end!

Many loops use a counter: a variable that counts how many times the loop has run. It usually goes through three stages:

  1. Set it before the loop starts: count = 1
  2. Test it in a decision: count <= 12? If Yes, run the loop steps. If No, leave the loop.
  3. Change it at the end of each time round: count = count + 1

Example 1: any times table

Try it: run the times-table loop

Type a number for n and step through. Watch count go up by 1 each time round. When does the loop stop? (Click Run to the end to go faster.)

Input (n):

StartInput ncount = 1count <= 12?NoYesStopanswer = n × countOutput n × count = answercount = count + 1

Variables

Output

What just happened

    Look at the arrow on the left: after count = count + 1, it goes back to the decision. When count reaches 13, count <= 12? is No, so the flowchart leaves the loop and stops. Twelve lines of output, but only one Output symbol!

    Example 2: the average of five numbers

    In the last-but-one post you averaged three numbers with three separate inputs. With a loop, one Input symbol can take as many numbers as you like. A running total starts at 0 and has each number added to it.

    Try it: run the average-of-five loop

    Type five numbers, then step through. Watch total grow each time round.

    Inputs (five numbers):

    Starttotal = 0count = 0count < 5?NoYesInput numtotal = total + numcount = count + 1average = total / 5Output averageStop

    Variables

    Output

    What just happened

      A Flowgorithm flowchart with a six-sided For loop shape that counts from start to stop, an output inside the loop, and End at the bottom.
      A counting loop in Flowgorithm. Flowgorithm has a special six-sided For shape that sets, tests and changes the counter all in one symbol. It does the same job as our decision diamond plus the count = count + 1 box.

      Image source: File:Flowgorithm For Loop.svg (Wikimedia Commons)

      Watch: a counting loop

      This video shows how to design a counting loop in a flowchart, and how to change where it starts, where it ends and how much it counts by.

      Video: Creating a Counting Loop in a Flowchart – Access 2 Learn – https://www.youtube.com/watch?v=wxvguFRrtIc

      Activity: trace the loop

      A trace table records the values of the variables each time round a loop. Copy and complete this one for the average-of-five flowchart, with the inputs 8, 6, 10, 4 and 7:

      Time roundnumtotalcountcount < 5?
      Before the loop–00Yes
      1881Yes
      26
      310
      44
      57

      Try it: check your trace

      Use your completed trace table.

      1. What is total after the 3rd time round?

      2. What is total when the loop ends?

      3. What is count when the loop ends?

      4. What is the output?

      5. In the times-table flowchart, how many lines are output when n = 9?

      Your turn

      • Change the times-table flowchart so it outputs only up to n × 5.
      • Draw a loop flowchart that outputs the numbers 1 to 10.
      • Challenge: draw a flowchart that inputs 5 marks and outputs how many of them are passes (50 or more). You will need a loop and a decision inside it.

      Self-check quiz

      Click the best answer. You get feedback straight away; only your first click counts towards your score.

      1. A loop is used to…

      2. In a flowchart, how can you tell where a loop is?

      3. What is the job of count = count + 1?

      4. A loop starts with count = 1 and keeps going while count <= 12. How many times does it run?

      5. Why does total start at 0?

      6. What would happen if a loop’s counter never changed?

      Related posts on islandclass.org

      For later, in Forms 4–5 (CSEC IT): these go deeper and are for when you reach CSEC Information Technology.

      Next: Scratch: Moving and Controlling Sprites

      Syllabus link: Forms 1–3 ICT curriculum, Module 5, Objective 5.12 – use flowchart symbols appropriately to represent an algorithm using a looping/repetition construct.

      Attributions to media used in this post:

      Updates

      2026/10/21

      - Fixed the activity code so its buttons keep working.

      © 2026 Vedesh Kungebeharry. All rights reserved.

      Flowcharts: Making Decisions

      Your report book says Pass or Fail next to each subject. A computer printed it, but nobody typed those words for each student. How did the computer decide which word to print?

      In this post:

      • What selection is, and how the decision symbol works
      • A pass/fail flowchart you can run
      • A grades flowchart with several decisions
      • Turning game rules into decisions, a tracing activity and a quiz

      Selection: choosing a path

      In a sequence, every step happens. With selection, the algorithm asks a question and chooses which steps to do next, depending on the answer. In a flowchart, the question goes in a decision diamond. Two arrows come out: one labelled Yes (the condition is true) and one labelled No (it is false). Afterwards, the two paths usually join up again.

      Conditions often compare values using these signs, called relational operators:

      SignMeaningExample (mark = 50)
      =is equal tomark = 50 → Yes
      <>is not equal tomark <> 50 → No
      >is greater thanmark > 50 → No
      <is less thanmark < 50 → No
      >=is greater than or equal tomark >= 50 → Yes
      <=is less than or equal tomark <= 50 → Yes

      Example 1: pass or fail

      Try it: run the pass/fail flowchart

      Type a mark, then step through. Try 72, then 35, then exactly 50. Which path does each mark take?

      Input (mark):

      StartInput markmark >= 50?YesNoOutput “Pass”Output “Fail”Stop

      Variables

      Output

      What just happened

        Why >= and not >? If the pass mark is 50, a student who scores exactly 50 has passed. mark > 50 would wrongly print “Fail” for 50. Always test the boundary value.

        Example 2: grades, with several decisions

        Here, the school gives an A for 75 and over, a B for 60 to 74, a C for 50 to 59 and a D below 50. One decision is not enough, so the flowchart asks up to three questions, one after another. As soon as one answer is Yes, it outputs the grade and goes to Stop.

        Try it: run the grades flowchart

        Try marks that give each grade, including the boundary marks 75, 60 and 50. Count how many decisions each mark goes through.

        Input (mark):

        StartInput markmark >= 75?YesNomark >= 60?YesNomark >= 50?YesNoOutput “A”Output “B”Output “C”Output “D”Stop

        Variables

        Output

        What just happened

          A Flowgorithm flowchart: Main, declare a real variable called value, output a prompt, input value, a decision value > 0, with two outputs saying whether the number is positive or not, then End.
          A selection flowchart made in Flowgorithm. It inputs a number, asks “value > 0?” and outputs whether the number is positive. The extra rectangle near the top declares (creates) the variable, which Flowgorithm needs before you use it. In Flowgorithm, the start is called Main.

          Image source: File:Flowgorithm Conditions.svg (Wikimedia Commons)

          Watch: if-else decisions in a flowchart

          This video shows how to draw a decision with different steps for when the condition is met and when it is not, called an if-else.

          Video: Making If-Else Style Decisions in a Flowchart – Access 2 Learn – https://www.youtube.com/watch?v=xC8h8ALwPvs

          Activity: game rules as decisions

          Remember the Snakes and Ladders algorithm? Its rules are decisions. “If the counter lands at the foot of a ladder, climb up” becomes a diamond asking “On a ladder?”. Yes leads to a process, “Move to the top of the ladder”. No skips it. Draw the flowchart for one turn: roll the die, move, check for a ladder, check for a snake, and check for square 30.

          Activity: predict the path

          Try it: what is the output?

          Use the grades flowchart (A 75+, B 60–74, C 50–59, D below 50). Type just the letter.

          1. mark = 90

          2. mark = 75

          3. mark = 74

          4. mark = 50

          5. mark = 49

          Self-check quiz

          Click the best answer. You get feedback straight away; only your first click counts towards your score.

          1. Which symbol is used for selection in a flowchart?

          2. How many labelled arrows leave a decision symbol?

          3. The pass mark is 50. Which condition gives the right answer for a mark of exactly 50?

          4. In the pass/fail flowchart, what is output for a mark of 49?

          5. What does <> mean?

          6. Why does the grades flowchart need more than one decision?

          Related posts on islandclass.org

          For later, in Forms 4–5 (CSEC IT): these go deeper and are for when you reach CSEC Information Technology.

          Next: Flowcharts: Repeating Steps with Loops

          Syllabus link: Forms 1–3 ICT curriculum, Module 5, Objective 5.11 – use flowchart symbols appropriately to represent an algorithm using a selection construct.

          Attributions to media used in this post:

          Updates

          2026/10/21

          - Fixed the activity code so its buttons keep working.

          © 2026 Vedesh Kungebeharry. All rights reserved.

          Flowcharts: Steps in Sequence

          Your three test marks this term are 64, 71 and 85. What is your average, and could you draw the steps so clearly that a computer could work it out for you?

          In this post:

          • What a sequence is
          • Drawing a sequence flowchart: the average of three numbers
          • Running a flowchart step by step and watching the variables change
          • Building your own flowchart for simple interest, tracing values and a quiz

          Sequence: one step after another

          The simplest kind of algorithm is a sequence: steps carried out one after another, in order, exactly once each, from Start to Stop. There are no questions and nothing repeats. Most sequence flowcharts follow the same pattern:

          1. Start
          2. Input the data you need
          3. Process it (do the calculations)
          4. Output the result
          5. Stop

          That is the input → process → output pattern you met in Form 1, now drawn as a flowchart.

          Example: the average of three numbers

          To find an average, add the numbers up and divide by how many there are. The flowchart uses three variables, a, b and c, to store the inputs. A variable is a named box in the computer’s memory that holds a value. Then sum and average store the results.

          Try it: run the flowchart

          Type three numbers in the box, then click Next step to follow the flowchart one symbol at a time. The orange outline shows where you are. Watch the variables fill up.

          Inputs (a, b, c):

          StartInput a, b, csum = a + b + caverage = sum / 3Output averageStop

          Variables

          Output

          What just happened

            Did you notice? The flowchart works for any three numbers. Change the inputs and run it again. That is the power of an algorithm: write it once, use it again and again.

            Flowgorithm

            The Flowgorithm program window with a toolbar at the top and a flowchart that uses coloured shapes: a yellow assignment, a green output, a pink decision and loop.
            The Flowgorithm editor. This flowchart is a number-guessing game, so it also has decisions and a loop, which you will learn in the next two posts. A sequence flowchart is just a straight line of shapes from Main (start) to End.

            Image source: File:Flowgorithm Editor.png (Wikimedia Commons)

            This short video shows how to make a first program in Flowgorithm, with steps in sequence and an output. In Flowgorithm, you must declare a variable (create its box) before you use it.

            Video: First Program in Flowgorithm – DamianBurrin – https://www.youtube.com/watch?v=u1O_Ml1qX1M

            Activity: build a flowchart for simple interest

            When you save money in a bank, it pays you interest. Simple interest is worked out with this formula: interest = principal × rate × time ÷ 100, where the principal is the amount saved, the rate is the percentage per year and the time is in years.

            Try it: put the flowchart together

            Put the steps in order with ▲ and ▼, and choose the right symbol for each one. Then click Check my flowchart.

            1. Start
            2. Input principal, rate, time
            3. interest = principal × rate × time ÷ 100
            4. total = principal + interest
            5. Output interest, total
            6. Stop

            Activity: trace the values

            Try it: what will the flowchart output?

            Work out each answer in your head or on paper, as if you were the computer. Then check.

            1. Average flowchart. Inputs: a = 4, b = 7, c = 10. What is sum?

            2. Same inputs. What is the output (the average)?

            3. Average flowchart. Inputs: 50, 60, 100. What is the output?

            4. Simple interest flowchart. Principal $1000, rate 5, time 2 years. What is the interest?

            5. Same savings. What is the total?

            Your turn

            • Draw a sequence flowchart that inputs the length and width of a rectangle and outputs its area and perimeter.
            • Draw a flowchart that inputs a temperature in °C and outputs it in °F (°F = °C × 9 ÷ 5 + 32).
            • If you have Flowgorithm, build one of them and run it.

            Self-check quiz

            Click the best answer. You get feedback straight away; only your first click counts towards your score.

            1. In a sequence, the steps are carried out…

            2. What usually comes straight after Start in a sequence flowchart?

            3. “average = sum / 3” goes in which symbol?

            4. A variable is…

            5. Why must “Input a, b, c” come before “sum = a + b + c”?

            6. Inputs 2, 4 and 9 go into the average flowchart. What is the output?

            Related posts on islandclass.org

            For later, in Forms 4–5 (CSEC IT): these go deeper and are for when you reach CSEC Information Technology.

            Next: Flowcharts: Making Decisions

            Syllabus link: Forms 1–3 ICT curriculum, Module 5, Objective 5.10 – use flowchart symbols appropriately to represent an algorithm using a sequential construct.

            Attributions to media used in this post:

            Updates

            2026/10/21

            - Fixed the activity code so its buttons keep working.

            © 2026 Vedesh Kungebeharry. All rights reserved.

            Flowchart Symbols

            Your lamp won’t switch on. What do you check first? Look at the picture below: it answers that question with just a few shapes and arrows. Can you follow it without any extra explanation?

            A simple flowchart. It starts with “Lamp doesn’t work”, asks “Lamp plugged in?” and, if no, says “Plug in lamp”. If yes, it asks “Bulb burned out?”: if yes, “Replace bulb”; if no, “Repair lamp”.
            A flowchart for fixing a lamp. The yellow diamonds are questions (decisions), and the arrows show which way to go for each answer. This one uses a rounded rectangle for the start. In our lessons, we draw start and stop as ovals.

            Image source: File:LampFlowchart.svg (Wikimedia Commons)

            In this post:

            • What a flowchart is and why we use one
            • The five symbols: terminal, input/output, process, decision and flow lines
            • Rules for drawing neat flowcharts
            • Reading a flowchart, matching symbols, and an introduction to Flowgorithm

            What is a flowchart?

            A flowchart is a diagram of an algorithm. Each step goes in a box, and the shape of the box tells you what kind of step it is. Arrows show the order. Flowcharts are easy to read at a glance, and programmers use them to plan a program before writing any code.

            The symbols

            SymbolNameUsed forExample
            Terminal (oval)The start and the stop of the flowchart. Every flowchart has one Start and at least one Stop.Start, Stop
            Input / Output (parallelogram)Input: getting data in, for example from the keyboard. Output: showing or printing a result.Input mark; Output “Pass”
            Process (rectangle)A calculation or action, such as working something out or storing a value.total = a + b; Boil the water
            Decision (diamond)A yes/no question. It has two arrows coming out, labelled Yes and No.mark >= 50?
            Flow line (arrow)Joins the symbols and shows the order to follow.→

            Rules for good flowcharts

            • Start at the top with one Start symbol, and finish with Stop.
            • Flow generally goes from top to bottom (and left to right).
            • Every symbol except Stop has an arrow leaving it. Arrows should not cross if you can help it.
            • A decision has exactly two exits, labelled Yes and No (or True and False).
            • Keep the words inside each symbol short and clear.

            Read a flowchart

            StartInput number of sugarsBoil the waterMix cocoa, sugar and waterAdd milk?YesAdd milkNoOutput “Cocoa ready!”Stop
            A flowchart for making a cup of cocoa. Find one example of each symbol.

            Try it: read the cocoa flowchart

            Click the best answer. You get feedback straight away; only your first click counts towards your score.

            1. In the cocoa flowchart, which symbol is used for “Boil the water”?

            2. Which step is an input?

            3. What happens if the answer to “Add milk?” is No?

            4. How many decisions are in this flowchart?

            Activity: match the symbols

            Try it: name the symbol

            Choose the name of each symbol.

            Try it: which symbol would you use?

            Choose the right symbol for each step.

            Start
            Input the price of a drink
            total = price × 2
            Is the total more than $20?
            Output the total
            Stop
            Add 1 to the score

            Watch: flowchart symbols

            This short video introduces common flowchart symbols. It also shows a few extra symbols that we do not use in Form 3, so focus on the five in the table above.

            Video: Introduction to Flowchart Symbols – Christopher Kalodikis – https://www.youtube.com/watch?v=kxZJv56BxU8

            Flowgorithm: flowcharts that run

            Flowgorithm is a free program for Windows that lets you build flowcharts and then run them, like a real program. Your teacher may have it on the lab computers (you can read about Flowgorithm on Wikipedia). It uses the same basic shapes as we do, plus a few extra ones for later. (On a Chromebook or tablet, you can draw flowcharts with the Shapes tool in Google Docs or on paper.)

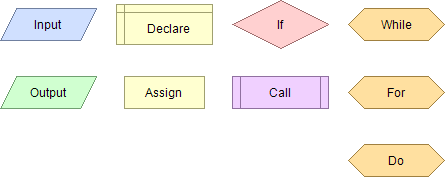
            Flowgorithm’s coloured shapes: Input and Output parallelograms, Declare and Assign rectangles, an If diamond, a Call shape, and While, For and Do loop shapes.
            The shapes in Flowgorithm. Input and Output are parallelograms and If is a diamond, just like ours. Declare and Assign are both kinds of process. The loop shapes (While, For and Do) are shortcuts you can learn later.

            Image source: File:Flowgorithm Shapes.png (Wikimedia Commons)

            Self-check quiz

            Click the best answer. You get feedback straight away; only your first click counts towards your score.

            1. Which symbol shows the start or end of a flowchart?

            2. Which symbol is used for a yes/no question?

            3. “Output the answer” goes in a…

            4. “area = length × width” goes in a…

            5. What do the arrows in a flowchart show?

            6. How many arrows leave a decision symbol?

            Related posts on islandclass.org

            For later, in Forms 4–5 (CSEC IT): these go deeper and are for when you reach CSEC Information Technology.

            Next: Flowcharts: Steps in Sequence

            Syllabus link: Forms 1–3 ICT curriculum, Module 5, Objective 5.9 – interpret flowchart symbols.

            Attributions to media used in this post:

            Updates

            2026/10/21

            – Fixed the activity code so its buttons keep working.

            © 2026 Vedesh Kungebeharry. All rights reserved.