How to Write a Synopsis and an Elevator Pitch for a Game or Animation

Before anyone agrees to fund, build or even read your project, they want to know one thing: what is it about? A synopsis is a short written summary of the whole story of an animation or game, from beginning to end, including the ending. An elevator pitch is a spoken summary short enough to deliver in a lift ride (about 30 to 60 seconds) that makes the listener want to hear more. Both grow from a logline: a single sentence that captures the heart of your idea.

In Story Development and Scriptwriting we turned an idea into a premise. In this post you will turn a premise into a synopsis and a pitch you can use with teachers, teammates, funders and publishers.

Logline, elevator pitch, synopsis and treatment: what is the difference?

ToolTypical lengthWhat it is for
Logline1 sentence (about 25–40 words)The hook. Who the main character is, what they want and what stands in the way.
Elevator pitch30–60 seconds spoken (about 75–150 words)Getting a busy person interested enough to ask for more.
SynopsisHalf a page to one page (about 150–500 words for a short project)Showing the complete story, including the ending, so readers can judge whether it works.
TreatmentSeveral pagesA detailed, scene-by-scene prose version of the story, written before the script.

What goes into a synopsis

  • Title, format and genre – for example “a five-minute 3D comedy short” or “a 2D puzzle-platformer for mobile”.
  • The protagonist and their goal – who we follow and what they want.
  • The setting – where and when the story happens.
  • The conflict – the problem, obstacle or antagonist that makes the goal hard to reach.
  • The key turning points – the big events that change the direction of the story.
  • The ending – a synopsis is not a teaser. Say how the story is resolved.
  • Tone and theme – is it funny, spooky or heartwarming, and what is it really about?

Animation synopsis vs game synopsis

An animation synopsis describes one fixed sequence of events. A game synopsis must also explain the player’s role and how the story is experienced through play: what the player does most of the time (the core gameplay), how the story unfolds across levels or chapters, and whether choices lead to different endings. Game synopses often add the genre, platform and target audience (see Types of Video Games: Game Genres, Game Goals and Game Platforms).

How to write a synopsis, step by step

  1. Write your logline first. If you cannot say it in one sentence, the idea is not clear yet.
  2. List the big story beats: the beginning (the normal world and the problem), the middle (attempts, setbacks and a turning point) and the end (the climax and resolution).
  3. Turn the beats into paragraphs written in the present tense and the third person (“Maya finds a map…”, not “I found a map…”).
  4. Name only the most important characters and cut the sub-plots.
  5. Show cause and effect: each event should lead to the next.
  6. Read it aloud, cut unnecessary words and ask someone who does not know the story whether it makes sense.
Poster for the animated short film Big Buck Bunny showing a large white rabbit and three rodents
Figure 1 – The poster for Big Buck Bunny (2008), a free, open-licensed short film made by the Blender Foundation. Its synopsis is used as an example below.

The elevator pitch

A pitch is a performance, not a document. A simple formula for a game or animation pitch is:

  1. Hook – an opening line that sparks curiosity.
  2. Who and what – the main character (or the player’s role) and their goal.
  3. Obstacle – what stands in the way and why it matters.
  4. What makes it special – the unique twist, art style, mechanic or cultural setting.
  5. The ask – what you want from the listener: feedback, a meeting, funding or a place in a competition.

Keep it conversational, practise it until you do not need notes, and adapt it to your audience. A teacher, a publisher and a funding agency care about different things. For more on e-portfolios, proposals and funding, see How to Pitch and Fund an Animation or Game Project.

Example

Logline (animation): A gentle giant rabbit, bullied by three mischievous rodents, sets aside his peaceful nature to teach them a lesson they will never forget.

Synopsis (animation): Big Buck Bunny is a ten-minute 3D comedy short. On a sunny morning, Big Buck Bunny, a huge and kind-hearted rabbit, steps out of his burrow to enjoy the forest and admire the butterflies. Three bullies, Frank the flying squirrel and his sidekicks Rinky and Gimera, amuse themselves by pelting forest creatures with fruit, nuts and rocks. When they knock two butterflies out of the sky and then attack Bunny himself, the rabbit decides enough is enough. He builds a series of clever traps and deals with Rinky and Gimera one at a time. Frank, unaware, glides towards Bunny and sets off the final trap. In the end, a satisfied Bunny watches a butterfly fly past towing Frank on a string like a kite. The film is about standing up to bullies, told through slapstick comedy with no dialogue.

Big white cartoon rabbit standing in a sunny forest
Figure 2 – Big Buck Bunny in the forest. A good synopsis tells the reader who the story is about, what goes wrong and how it ends.

Elevator pitch (game): “Every year, thousands of baby leatherback turtles hatch on Grande Riviere beach in Trinidad, and only a tiny fraction survive to become adults. Hatchling Dash is a colourful mobile arcade game for ages six and up where you guide one tiny turtle from its nest to the ocean, dodging crabs, seabirds and plastic litter, then swim through three reef levels to reach the feeding grounds. Each level teaches a real fact about turtle conservation, and players can unlock a clean-up mode where they remove litter to help future hatchlings. We are looking for feedback on our first playable level. Can I show you?”

Watch this short TED video to learn how to build a pitch around your audience:

Exercise

  1. Write a logline for a film, cartoon or game you know well. Check that it names the main character, the goal and the obstacle.
  2. Create a synopsis (150–300 words) for an original animation based on a culturally relevant theme from your community, such as a festival, a folk tale or an environmental issue.
  3. Rewrite your idea as a game synopsis. Add the player’s role, the core gameplay, the number of levels or chapters and how the story ends.
  4. Turn one of your synopses into a 45-second elevator pitch using the five-step formula. Record yourself on a phone and time it.
  5. Swap pitches with a partner. Give each other one strength and one improvement, then revise.

Next: Story Arcs Explained: Five-Point, Eight-Point and Three-Act Structures for Games and Animation

Syllabus link: This post is relevant to the CAPE® Animation and Game Design Syllabus, Unit 1: Fundamentals of Animation and Game Design, Module 3: Story and Character Development – Specific Objective 1 (“create a synopsis for a game or animation”).

Attributions to media used in this post:

Big buck bunny poster big.jpg – Blender Foundation (peach.blender.org) – CC BY 3.0 (via Wikimedia Commons)

Big Buck Bunny – forest.jpg – Blender Foundation / Project Peach – CC BY 3.0 (via Wikimedia Commons)

© 2026 Vedesh Kungebeharry. All rights reserved.

Environment Design for Game Genres and Creating Digital Artwork: Scanning, Clean-Up and Free Software

Great animation and games start with a great story. Story development is the process of turning a simple idea into a complete story with characters, a plot and a setting. A script is the written version of that story: it describes what happens and what the characters say, so the whole team can build it.

Steps in story development

  1. Idea (premise) – a one-sentence summary. For example: “A shy steelpan player must win a competition to save her community centre.”
  2. Research – learn about the setting, the culture and anything else your story needs.
  3. Characters – decide who the main character (protagonist) is, what they want, and who or what stands in their way (the antagonist).
  4. Outline – list the main events from beginning to end.
  5. Script – write the scenes, actions and dialogue.
  6. Storyboard – draw the key shots in order.
  7. Review and revise – share it, get feedback and improve it.

Basic storyboarding

A storyboard is a sequence of drawings, like a comic strip, that shows each shot of an animation or each key moment of a game’s story. Under each frame you add notes about action, dialogue, sound and camera movement. Stick figures are fine: a storyboard is for planning, not for final art. See also: Storyboards – Professional Video Creation (Part 1).

Hand-drawn storyboard sheet with sketched frames and notes
Figure 1 – A hand-drawn storyboard (notes in Spanish). Each frame is labelled with its scene and shot number, and the shot type and action are written underneath.

The story arc

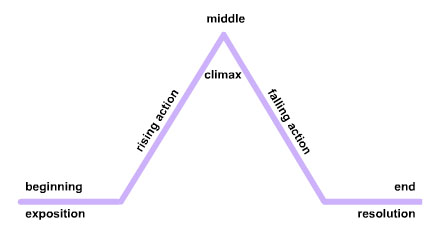
A story arc is the shape of a story from beginning to end. A common version, often drawn as a mountain, has five parts:

  1. Exposition – introduces the characters, setting and normal life.
  2. Rising action – a problem appears and things get more difficult.
  3. Climax – the most exciting or important moment, the turning point.
  4. Falling action – the results of the climax play out.
  5. Resolution – the problem is solved and a new normal begins.
Diagram of a story arc shaped like a mountain
Figure 2 – A “plot mountain” diagram of a story arc: exposition, rising action, climax, falling action and resolution.

Creative writing concepts

  • Show, don’t tell – in a visual medium, show a character’s feelings through actions and expressions instead of explaining them.
  • Conflict – every story needs a problem. No conflict, no story.
  • Theme – the big idea behind the story, such as friendship or courage.
  • Point of view and voice – whose eyes do we see the story through, and how do they speak?

Character development

Character development means creating believable characters and showing how they change during the story (their character arc). A simple character profile lists the character’s name, age, appearance, personality, goal, fear and strengths and weaknesses. Artists then draw a model sheet showing the character from different angles so everyone draws them the same way.

Character model sheet showing front, side and back views
Figure 3 – A character model sheet from the open movie Sintel, showing the same character from several angles.

Script format: animation vs games

Animation scriptGame script
Follows one fixed order of scenes, from start to finish.Can branch: the player’s choices may lead to different scenes and endings.
Written in screenplay format: scene heading (e.g. EXT. BEACH – DAY), action lines, character name and dialogue.Often written in spreadsheets or special tools, with an ID for each line, the character, the dialogue and the condition that triggers it.
Action lines describe movement and expressions in detail because everything must be drawn or animated.Includes cutscenes, in-game dialogue, short reactions (sometimes called “barks”), tutorial text and item descriptions.
One script leads to one storyboard and one finished film.Must work together with the gameplay, level design and programming.

A short animation script might look like this:

EXT. BEACH – SUNSET
MAYA (12) drags a heavy steelpan across the sand. She stops and wipes her forehead.
MAYA: One more practice. Just one.

For more on scripts, see The Video Script – Professional Video Creation (Part 4).

Example

Premise: “A young turtle must clean her polluted reef before the big storm.” Exposition: the turtle’s happy home. Rising action: plastic appears and fish get trapped. Climax: she frees the largest fish from a net as the storm arrives. Falling action: the fish help her. Resolution: the reef is clean. In the game version, the player could choose whether to fight the net or find a clever way around it, leading to two different scenes.

Watch the video below from Pixar in a Box by Khan Academy to learn more about story structure:

Exercise

  1. List the steps of story development in order.
  2. Write a one-sentence premise for a short animation, then plan it with the five parts of a story arc.
  3. Create a character profile and a simple three-view model sheet for your main character.
  4. Draw a six-frame storyboard for the opening of your story and write a half-page script for the same scene in screenplay format.

Next: Environment Design for Game Genres and Creating Digital Artwork: Scanning, Clean-Up and Free Software

Syllabus link: This post is relevant to the CAPE® Animation and Game Design Syllabus, Unit 1: Fundamentals of Animation and Game Design, Module 2: Drawing and Layout – Specific Objective 8 (“identify the steps used for story development”); Specific Objective 9 (“apply concepts to design a script for animation and game design”).

Attributions to media used in this post:

Storyboard – Iván López Fuente.jpg – Iván López Fuente – CC BY-SA 4.0 (via Wikimedia Commons)

Plotmountain.jpg – Kaede4 – Public domain (via Wikimedia Commons)

Character Sintel-model-sheet.png – David Revoy / Blender Foundation – CC BY 3.0 (via Wikimedia Commons)

© 2026 Vedesh Kungebeharry. All rights reserved.
Story Development and Scriptwriting for Animation and Games: Storyboards, Story Arcs and Characters

Great animation and games start with a great story. Story development is the process of turning a simple idea into a complete story with characters, a plot and a setting. A script is the written version of that story: it describes what happens and what the characters say, so the whole team can build it.

Steps in story development

  1. Idea (premise) – a one-sentence summary. For example: “A shy steelpan player must win a competition to save her community centre.”
  2. Research – learn about the setting, the culture and anything else your story needs.
  3. Characters – decide who the main character (protagonist) is, what they want, and who or what stands in their way (the antagonist).
  4. Outline – list the main events from beginning to end.
  5. Script – write the scenes, actions and dialogue.
  6. Storyboard – draw the key shots in order.
  7. Review and revise – share it, get feedback and improve it.

Basic storyboarding

A storyboard is a sequence of drawings, like a comic strip, that shows each shot of an animation or each key moment of a game’s story. Under each frame you add notes about action, dialogue, sound and camera movement. Stick figures are fine: a storyboard is for planning, not for final art. See also: Storyboards – Professional Video Creation (Part 1).

Hand-drawn storyboard sheet with sketched frames and notes
Figure 1 – A hand-drawn storyboard (notes in Spanish). Each frame is labelled with its scene and shot number, and the shot type and action are written underneath.

The story arc

A story arc is the shape of a story from beginning to end. A common version, often drawn as a mountain, has five parts:

  1. Exposition – introduces the characters, setting and normal life.
  2. Rising action – a problem appears and things get more difficult.
  3. Climax – the most exciting or important moment, the turning point.
  4. Falling action – the results of the climax play out.
  5. Resolution – the problem is solved and a new normal begins.
Diagram of a story arc shaped like a mountain
Figure 2 – A “plot mountain” diagram of a story arc: exposition, rising action, climax, falling action and resolution.

Creative writing concepts

  • Show, don’t tell – in a visual medium, show a character’s feelings through actions and expressions instead of explaining them.
  • Conflict – every story needs a problem. No conflict, no story.
  • Theme – the big idea behind the story, such as friendship or courage.
  • Point of view and voice – whose eyes do we see the story through, and how do they speak?

Character development

Character development means creating believable characters and showing how they change during the story (their character arc). A simple character profile lists the character’s name, age, appearance, personality, goal, fear and strengths and weaknesses. Artists then draw a model sheet showing the character from different angles so everyone draws them the same way.

Character model sheet showing front, side and back views
Figure 3 – A character model sheet from the open movie Sintel, showing the same character from several angles.

Script format: animation vs games

Animation scriptGame script
Follows one fixed order of scenes, from start to finish.Can branch: the player’s choices may lead to different scenes and endings.
Written in screenplay format: scene heading (e.g. EXT. BEACH – DAY), action lines, character name and dialogue.Often written in spreadsheets or special tools, with an ID for each line, the character, the dialogue and the condition that triggers it.
Action lines describe movement and expressions in detail because everything must be drawn or animated.Includes cutscenes, in-game dialogue, short reactions (sometimes called “barks”), tutorial text and item descriptions.
One script leads to one storyboard and one finished film.Must work together with the gameplay, level design and programming.

A short animation script might look like this:

EXT. BEACH – SUNSET
MAYA (12) drags a heavy steelpan across the sand. She stops and wipes her forehead.
MAYA: One more practice. Just one.

For more on scripts, see The Video Script – Professional Video Creation (Part 4).

Example

Premise: “A young turtle must clean her polluted reef before the big storm.” Exposition: the turtle’s happy home. Rising action: plastic appears and fish get trapped. Climax: she frees the largest fish from a net as the storm arrives. Falling action: the fish help her. Resolution: the reef is clean. In the game version, the player could choose whether to fight the net or find a clever way around it, leading to two different scenes.

Watch the video below from Pixar in a Box by Khan Academy to learn more about story structure:

Exercise

  1. List the steps of story development in order.
  2. Write a one-sentence premise for a short animation, then plan it with the five parts of a story arc.
  3. Create a character profile and a simple three-view model sheet for your main character.
  4. Draw a six-frame storyboard for the opening of your story and write a half-page script for the same scene in screenplay format.

Next: Environment Design for Game Genres and Creating Digital Artwork: Scanning, Clean-Up and Free Software

Syllabus link: This post is relevant to the CAPE® Animation and Game Design Syllabus, Unit 1: Fundamentals of Animation and Game Design, Module 2: Drawing and Layout – Specific Objective 8 (“identify the steps used for story development”); Specific Objective 9 (“apply concepts to design a script for animation and game design”).

Attributions to media used in this post:

Storyboard – Iván López Fuente.jpg – Iván López Fuente – CC BY-SA 4.0 (via Wikimedia Commons)

Plotmountain.jpg – Kaede4 – Public domain (via Wikimedia Commons)

Character Sintel-model-sheet.png – David Revoy / Blender Foundation – CC BY 3.0 (via Wikimedia Commons)

© 2026 Vedesh Kungebeharry. All rights reserved.

Folklore, Culture and Heritage in Animation and Game Design (With Caribbean Examples)

Some of the most memorable animations and games are built on real culture: the stories, festivals, buildings and art of a particular place. Socio-cultural context means the social and cultural background that gives an idea its meaning. Applying it to your work means using your own community’s folklore (traditional stories and characters), heritage (what is passed down from the past) and everyday life to create characters and worlds that feel original and authentic.

This post uses Caribbean examples, but the method works anywhere. Wherever you live, your own culture’s folklore and heritage is a rich source of ideas.

Why use local culture in animation and games?

  • Originality – local stories give you characters and settings that audiences have not seen a hundred times before.
  • Authenticity – you know the details: the food, the music, the way people speak.
  • Preserving heritage – animation and games can keep traditional stories alive for younger generations.
  • Sharing with the world – a story told well can travel to audiences in other countries.

Folklore and character development

Folklore characters already have strong looks, personalities and rules, which makes them great starting points for character design. Here are some examples from Caribbean folklore, especially Trinidad and Tobago:

  • Papa Bois (French patois for “father of the forest”) – the keeper and protector of the forest and its plants and animals. He is often described as a short, strong old man with cloven hooves, a beard of leaves and small horns.
  • Mama Dlo or Mama D’Leau (from the French maman de l’eau, “mother of the water”) – the protector of rivers and river animals. She is usually shown as a woman with long hair whose body twists into snake-like coils from the waist down.
  • Soucouyant – a reclusive old woman by day who, at night, strips off her skin and flies across the sky as a ball of fire. Versions of this character appear across the Caribbean, for example as Ol’ Higue in Guyana and Jamaica.
  • Anansi – a clever spider trickster from the folklore of the Akan people of Ghana. His stories travelled to the Caribbean with enslaved Africans; in Jamaica he is often called Anancy.
Black and white illustration of Anansi from Annancy Stories, 1899
Figure 1 – An illustration from Annancy Stories (1899), a book of Jamaican folk tales written and illustrated by Pamela Colman Smith.

Notice how each character already suggests gameplay or story: Papa Bois and Mama Dlo protect nature, so they could be guides or guardians in an environmental game; Anansi wins by tricking bigger animals, which suits a puzzle or stealth game.

Festivals and celebrations

Festivals are full of colour, music, movement and costume design. Examples in the Caribbean include Carnival in Trinidad and Tobago, Crop Over in Barbados, Junkanoo in The Bahamas, and religious festivals such as Divali and Eid. Carnival “mas” (masquerade) has traditional characters with their own costumes and movements:

  • Moko Jumbie – a costumed dancer on tall stilts. The tradition is linked to West African stilt-dancing, and “jumbie” is a Caribbean word for a spirit.
  • Jab Molassie – the “molasses devil”. Jab comes from the French patois diable (devil), and players cover their bodies in molasses or oil. There are devil characters of different colours, such as the blue devils of Paramin in Trinidad.
Moko Jumbie stilt dancer in a colourful costume at a festival
Figure 2 – A Moko Jumbie stilt dancer performing at a festival. Tall, swaying movement like this makes a striking animated character.
Children painted blue performing as devil characters in Trinidad
Figure 3 – Children painted as blue devils at the Junior Jab competition in Paramin, Trinidad, during the Carnival season.

Monuments, artefacts and architecture

Real places and objects make excellent environments and props:

  • Monuments such as Brimstone Hill Fortress in St Kitts, a UNESCO World Heritage Site, could inspire a castle-style level.
  • Artefacts such as the steelpan, which was developed in Trinidad and Tobago in the twentieth century, or Indigenous pottery displayed in museums, can become collectable items or story clues.
  • Architecture such as colonial buildings and wooden houses decorated with “gingerbread” fretwork gives a town an instantly recognisable look.
Ornate wooden gingerbread house with fretwork in Port of Spain
Figure 4 – Boissiere House (1904) in Port of Spain, Trinidad, known for its decorative “gingerbread” woodwork.

Being respectful and accurate

  • Research from reliable sources: museums, libraries, heritage organisations and people who practise the tradition.
  • Ask elders and cultural practitioners; the syllabus even suggests inviting folk troupes and heritage experts to speak.
  • Avoid stereotypes and do not turn living religious practices or sacred objects into jokes or monsters.
  • Credit the stories and communities you draw from.

Example

Game concept: Guardians of the Forest. The player is a young hiker lost in a rainforest. Papa Bois tests the player with puzzles about protecting animals, Mama Dlo blocks rivers that have been polluted until the player cleans them, and Anansi appears as a helpful but tricky guide. The final level takes place at a festival in a town of gingerbread houses, with Moko Jumbies towering over the crowd.

Watch the animated video below to learn about Anansi and how his stories travelled:

Exercise

  1. Choose a folklore character from your own culture. Research it from at least two reliable sources and write down its appearance, powers and the lesson its story teaches.
  2. Design an animation or game character based on that folklore character. Draw a front view and describe how it moves.
  3. Choose a local festival, monument, artefact or building. Sketch an environment or prop for a game inspired by it.
  4. Write two sentences explaining how you made sure your design is respectful and accurate.

Next: Story Development and Scriptwriting for Animation and Games: Storyboards, Story Arcs and Characters

Syllabus link: This post is relevant to the CAPE® Animation and Game Design Syllabus, Unit 1: Fundamentals of Animation and Game Design, Module 2: Drawing and Layout – Specific Objective 7 (“apply socio-cultural context to the development of local ideas and concepts”).

Attributions to media used in this post:

Anansi-34.png – Pamela Colman Smith – Public domain (via Wikimedia Commons)

Moko Jumbie in Sugarland tx.jpg – Beniray – CC BY-SA 4.0 (via Wikimedia Commons)

Jab Jab.jpg – Lesley Granderson – CC BY-SA 4.0 (via Wikimedia Commons)

Boissiere House (13411012855).jpg – David Stanley – CC BY 2.0 (via Wikimedia Commons)

© 2026 Vedesh Kungebeharry. All rights reserved.

What Is a Level in Game Design? Structuring Gameplay and Outlining Your First Three Levels

In game design, a level is a section of a game with its own space, challenges and goal. The player must complete one level to move on to the next. Level design is the job of planning each level: its layout, obstacles, enemies, rewards and difficulty, so that the game gets more interesting as the player improves.

What is a level?

A level usually has:

  • A start and an end (or goal), such as reaching a door, collecting all the coins or defeating a boss.
  • An environment – the place where the level happens, such as a beach, a cave or a space station.
  • Challenges – enemies, gaps, puzzles or time limits.
  • Rewards – points, new abilities, story scenes or simply the next level.
Sample 2D platformer level with platforms, ladders and spikes
Figure 1 – A sample platform game level made with free (CC0) game assets. You can see platforms, hazards and collectables arranged into a path.

Structuring the gameplay

Good levels are carefully ordered. Designers think about:

  • Teaching – introduce one new idea (a mechanic) at a time, in a safe place, so the player can learn it without being punished.
  • Difficulty curve – make each level a little harder than the last, with some easier moments to rest.
  • Pacing – mix fast, exciting moments with slower moments of exploring.
  • Guiding the player – use light, colour, paths and collectables to show where to go.
  • Checkpoints – places where progress is saved, so a mistake does not send the player all the way back.
  • Variety – change the setting, music, enemies or type of challenge from level to level so the game does not feel repetitive.

Many designers first sketch a level on paper or build a quick blockout in a level editor, then playtest it and improve it.

Screenshot of the Tiled map editor with a tile-based terrain map
Figure 2 – The free, open-source Tiled map editor, one of many tools used to lay out 2D game levels from tiles.

Ways of dividing a game

Not every game calls its sections “levels”. Common terms include:

TermMeaningWhere you might see it
LevelA single stage with a start, challenges and a goal.Platform and puzzle games
MissionA task with specific objectives, often with a briefing before it.Action, strategy and racing games
QuestA task given by a character, often with a story reason. Games can have a main quest and side quests.Role-playing and adventure games
EpisodeA part of the game released or played as one instalment, like a TV episode.Story-driven and episodic games
WorldA group of levels that share a theme or setting, such as an ice world.Platform games
ChapterA section of the story, like a chapter in a book.Story and adventure games

Outlining the first three levels

The first three levels are especially important because they teach the player how to play and convince them to keep going. A simple outline for each level should state the setting, the goal, the new mechanic or challenge and how it ends.

Example

Game idea: Reef Rescue, a 2D game where a young turtle cleans plastic from a coral reef.

  1. Level 1 – Shallow Lagoon (tutorial): Goal: collect 10 pieces of plastic. New mechanic: swimming and collecting. No enemies. Ends when the turtle reaches the reef gate.
  2. Level 2 – Seagrass Maze: Goal: collect 20 pieces and find the exit. New challenge: slow-moving jellyfish to avoid, and a checkpoint halfway.
  3. Level 3 – Coral Canyon: Goal: free three trapped fish from nets. New mechanic: a dash move to break nets. Combines everything learned, then ends with a mini-boss: a runaway fishing net.

Together these three levels could form World 1 of the game. Try the Scratch project below, a scrolling platformer with three levels. Notice what changes from one level to the next:

Watch the video below to see how one famous series introduces and develops a new idea in every level:

Exercise

  1. In your own words, define a level in game design.
  2. Explain the difference between a mission, a quest and a world.
  3. Choose a game idea of your own. Outline its first three levels, giving the setting, goal, new mechanic or challenge, and ending for each.
  4. Sketch a top-down or side-view map of Level 1 on paper. Mark the start, the goal, one checkpoint and the place where the new mechanic is taught.

Next: Folklore, Culture and Heritage in Animation and Game Design (With Caribbean Examples)

Syllabus link: This post is relevant to the CAPE® Animation and Game Design Syllabus, Unit 1: Fundamentals of Animation and Game Design, Module 2: Drawing and Layout – Specific Objective 5 (“define the concept of a level in game design”); Specific Objective 6 (“outline the first three levels of a game”).

Attributions to media used in this post:

1-bit platformer sample.png – Kenney (kenney.nl) – CC0 (via Wikimedia Commons)

Tiled-screenshot-terrain.png – Thorbjørn Lindeijer – CC BY-SA 3.0 (via Wikimedia Commons)

© 2026 Vedesh Kungebeharry. All rights reserved.

Colour Theory, Texture, Composition and Layout for Animation and Game Scenes

A good environment is not only drawn in correct perspective. It also needs the right colours, believable textures and a clear composition so that the viewer knows where to look. Colour theory is the set of ideas that explains how colours mix, how they work together and how they make us feel. Layout is the planning of where everything – characters, props and the camera – goes in a scene.

Colour theory

The colour wheel

The colour wheel arranges colours in a circle so you can see how they relate. The traditional painter’s wheel uses red, yellow and blue:

  • Primary colours – red, yellow and blue. They cannot be mixed from other paint colours.
  • Secondary colours – orange, green and violet, made by mixing two primaries.
  • Tertiary colours – such as red-orange or blue-green, made by mixing a primary with a secondary next to it.

Screens work differently: they mix light, and their primary colours are red, green and blue (RGB). That is why digital art software lets you pick colours using RGB values or a hex code such as #FF8C1A.

Colour wheel with twelve labelled hues
Figure 1 – A red–yellow–blue (RYB) colour wheel showing primary, secondary and tertiary colours.

Hue, saturation and value

  • Hue – the colour family (red, blue, green…).
  • Saturation – how strong or dull the colour is.
  • Value – how light or dark the colour is. Adding white makes a tint; adding black makes a shade.

Colour harmonies

Colour harmonies (colour schemes) are combinations that usually look good together:

  • Complementary – two colours opposite each other on the wheel, such as blue and orange. They create strong contrast and are great for making a character stand out from the background.
  • Analogous – three or so colours next to each other, such as yellow, yellow-green and green. They feel calm and unified, which suits a peaceful forest.
  • Triadic – three colours evenly spaced around the wheel, such as red, yellow and blue. They feel bright and playful.
  • Monochromatic – different tints and shades of one hue.

Colours can also be warm (reds, oranges, yellows) or cool (blues, greens, violets). Warm colours tend to feel energetic and seem to come forward; cool colours tend to feel calm and seem to move back, which also helps with depth.

Squares showing complementary colour pairs
Figure 2 – Pairs of complementary colours from the traditional colour wheel. Each pair creates strong contrast.

Texture

Texture is how a surface feels or looks as if it would feel: rough bark, smooth glass, wet sand, rusty metal. Actual texture can be touched (for example on a clay model), while visual or implied texture is created with marks, patterns, highlights and shadows. In 3D games, images called texture maps are wrapped around models to give them surface detail. Using a variety of textures makes an environment feel real and helps the player tell surfaces apart, such as which floor is slippery ice.

Composition and layout

Scene design

Composition is how the parts of a picture are arranged. Some useful guidelines:

  • Focal point – decide on the most important thing and make it stand out using contrast, colour or light.
  • Rule of thirds – divide the frame into a 3 × 3 grid and place important things on the lines or where they cross.
  • Leading lines – roads, rivers or fences that lead the eye towards the focal point.
  • Balance and framing – spread visual weight around the frame and use foreground objects such as trees or doorways to frame the action.
Two photos compared, one cropped using the rule of thirds
Figure 3 – The rule of thirds: in the edited version on the left, the rock pillar sits on a third line instead of near the centre (original on the right).

Blocking

Blocking is planning where characters stand and move in a scene, and where the camera is. In animation, the layout artist blocks out each shot with rough shapes before any detailed drawing, so the director can check the staging. In game design, level designers make a blockout (sometimes called a greybox): a quick version of the level built from plain boxes to test the size, paths and gameplay before the final art is made.

Painted concept art of a hut in a misty forest
Figure 4 – Concept art of a hut from the open movie Sintel. Notice the textured wood and rock, the limited colour scheme and the framing trees.

Example

For a scary night level in a jungle, you could choose an analogous scheme of dark blues and greens, then light a doorway in warm orange as the focal point (a complementary contrast). Rough bark and wet leaves give texture, and the doorway sits on a rule-of-thirds line. A quick blockout checks that the path to the door is clear before you paint anything.

Follow along with the video below, which explains the colour wheel and colour harmonies:

Exercise

  1. Paint or digitally colour a 12-part colour wheel. Label the primary, secondary and tertiary colours.
  2. Colour the same simple landscape twice: once with a complementary scheme and once with an analogous scheme. Which feels calmer?
  3. Make a texture sheet of six squares: rough, smooth, wet, furry, metallic and wooden.
  4. Sketch a scene using the rule of thirds, then draw a top-down blocking plan showing where two characters and the camera are.

Next: What Is a Level in Game Design? Structuring Gameplay and Outlining Your First Three Levels

Syllabus link: This post is relevant to the CAPE® Animation and Game Design Syllabus, Unit 1: Fundamentals of Animation and Game Design, Module 2: Drawing and Layout – Specific Objective 4 (“apply knowledge of design principles for environmental design”); Specific Objective 2 (“apply drawing and design principles for layout /environment and character development”).

Attributions to media used in this post:

Simple RYB Color Wheel without Title.png – Revulo.Studio – CC0 (via Wikimedia Commons)

Constrast of Complementary Colors – Clearer Version.png – 0xva – CC BY-SA 4.0 (via Wikimedia Commons)

RuleOfThirds-SideBySide.gif – Teeks99 (derivative of a photo by Pir6mon) – CC BY-SA 3.0 (via Wikimedia Commons)

Environments-02-shaman-hut.png – David Revoy / Blender Foundation – CC BY 3.0 (via Wikimedia Commons)

© 2026 Vedesh Kungebeharry. All rights reserved.

Layers of an Environment and Perspective Drawing: Foreground, Midground, Background and 1-, 2- and 3-Point Perspective

Every scene in an animation or game takes place in an environment: the world around the characters. To make a flat screen feel deep, artists split the environment into layers and draw it using perspective, a set of rules that makes objects look smaller and closer together as they get further away.

The layers of an environment

Most scenes can be split into three main layers:

  • Foreground – the layer closest to the viewer. It may hold grass, rocks, railings or branches that frame the scene. Objects here are large and detailed.
  • Midground (middle ground) – where the main action usually happens. Characters, platforms and important props are often placed here.
  • Background – the layer furthest away, such as the sky, mountains, the sea or a city skyline. It sets the location and mood but has less detail.

Artists show depth between the layers by using overlap (near objects cover far ones), size (far objects are smaller), detail (far objects are simpler) and atmospheric perspective (far objects look lighter, bluer and have less contrast).

Parallax scrolling

In 2D games and animations, the layers are often drawn separately and moved at different speeds. The background moves slowly and the foreground moves quickly, which makes the scene feel three-dimensional. This is called parallax scrolling.

Animated city skyline with three layers scrolling at different speeds
Figure 1 – Parallax scrolling with three 2D layers. The nearest layer moves fastest and the furthest layer moves slowest.

Try the Scratch project below. Use the arrow keys and watch how the layers move at different speeds:

Observational drawing

Observational drawing means drawing what you actually see in front of you – a street, a classroom, a still life of objects on a table – rather than what you think things look like. It trains your eye to notice shapes, proportions, light and shadow. Environment artists often sketch real places first and then change them to fit an animated or game world.

Perspective drawing

Linear perspective uses a few key terms:

  • Horizon line (eye level) – a horizontal line across the picture at the height of the viewer’s eyes.
  • Vanishing point – a point where parallel lines (such as the two edges of a road) appear to meet.
  • Orthogonal lines – lines that run from the corners of objects towards a vanishing point.

One-point perspective

One-point perspective has a single vanishing point on the horizon line. It is used when you look straight down a road, a corridor, a railway line or a room. Fronts of objects face you as flat shapes, while their sides go back to the one point.

Labelled diagram of one-point perspective with boxes
Figure 2 – One-point perspective: the horizon line, the single vanishing point and the orthogonal lines.

Two-point perspective

Two-point perspective has two vanishing points, one on each side of the horizon line. It is used when you look at the corner of an object, such as a building on a street corner. Vertical lines stay vertical.

Diagram of a building drawn in two-point perspective
Figure 3 – Two-point perspective: the sides of the building go back towards two vanishing points on the horizon line.

Three-point perspective

Three-point perspective adds a third vanishing point above or below the horizon line. It is used for dramatic views, such as looking up at a tall tower (a “worm’s-eye view”) or down from a rooftop (a “bird’s-eye view”). Game and film artists use it to make things look huge or dizzying.

Cube drawn in three-point perspective
Figure 4 – A cube in three-point perspective: even the vertical edges lean towards a third vanishing point.

Example

Imagine a side-scrolling game set in a fishing village at sunset:

  • Foreground: a wooden jetty post and some fishing nets that pass quickly across the screen.
  • Midground: the beach and boats where the player runs and jumps.
  • Background: the sea, distant hills and an orange sky, drawn lighter and with less detail, moving slowly.

For the village’s title screen you could draw the main street in one-point perspective, with the vanishing point where the street meets the sea.

Watch the video below to see how games use parallax layers to create depth:

Exercise

  1. Name the three layers of an environment and describe what might be found in each layer of a forest scene.
  2. Do an observational drawing of a corridor or road using one-point perspective. Mark the horizon line and vanishing point.
  3. Draw a simple building on a street corner in two-point perspective.
  4. Draw a tall tower from a worm’s-eye view using three-point perspective.

Next: Colour Theory, Texture, Composition and Layout for Animation and Game Scenes

Syllabus link: This post is relevant to the CAPE® Animation and Game Design Syllabus, Unit 1: Fundamentals of Animation and Game Design, Module 2: Drawing and Layout – Specific Objective 3 (“identify layers of an environment”); Specific Objective 4 (“apply knowledge of design principles for environmental design”).

Attributions to media used in this post:

Parallax scroll.gif – NuclearDuckie – CC0 (via Wikimedia Commons)

One Point Perspective Example.jpg – Maura Valentino – CC BY 4.0 (via Wikimedia Commons)

TwoPointPerspective.png – Mmroberts – CC BY 3.0 (via Wikimedia Commons)

Perspective cube.png – MrNoble.xyz – CC0 (via Wikimedia Commons)

© 2026 Vedesh Kungebeharry. All rights reserved.

The Game Design Process: Brainstorming, Rapid Prototyping, Playtesting and RAD vs Waterfall

The game design process is the set of stages a team goes through to turn an idea into a finished game. Most modern game teams use an iterative process: they build a small version of the game, test it with players, improve it, and repeat until the game is fun. A popular approach built on this idea is Rapid Application Development (RAD).

Stage 1: The creative process

Every game starts with ideas:

  • Brainstorming – a group discussion where everyone suggests ideas freely, without judging them at first.
  • Ideation – developing, combining and choosing the best ideas, then describing the core concept (for example: “a puzzle game where you rotate the world to guide a ball home”).

Stage 2: The iterative process

Instead of planning everything and building the whole game at once, the team works in short cycles:

  1. Rapid prototyping – quickly conceptualise, design, code and test a rough playable version (a prototype). Prototypes can even be made with paper, cards and dice before any code is written.
  2. Play test – real players try the prototype while the team watches and takes notes. Is it fun? Confusing? Too hard? Are there bugs?
  3. Revision – change the design based on what was learned: fix problems, remove what does not work and improve what does.
  4. Repeat – build the next version and test again. Each cycle is called an iteration.
Iterative development cycle diagram
Figure 1 – An iterative development cycle: after initial planning, the team repeatedly plans, designs, implements, tests and evaluates, and deploys when the product is ready.
Paper prototype of a game with cards and a hand-drawn board
Figure 2 – A paper prototype made by game designer Jason Rohrer while developing his video game Diamond Trust of London (released 2012).
People playtesting a card game at a game jam
Figure 3 – Game jam participants playtesting a new game.

What is RAD?

Rapid Application Development (RAD) is an approach to software development that puts less emphasis on detailed planning up front and more on building working prototypes quickly and changing requirements as the team learns. The term is also linked to James Martin, who described a RAD method in the early 1990s. In games, RAD fits naturally with rapid prototyping and playtesting.

Plan-based methods: the waterfall model

Plan-based methods do most of the planning before development begins. The best-known is the waterfall model, where each stage is finished before the next one starts: requirements, design, implementation, verification (testing) and maintenance.

Waterfall model diagram
Figure 4 – The waterfall model: each stage flows down into the next.

RAD vs waterfall

RAD / iterativeWaterfall
PlanningLight planning at the start, refined as you goDetailed planning at the start
ChangeChanges are expected and welcomedChanges are difficult and costly later on
TestingEarly and often, with real playersMainly near the end
Working versionAvailable early (prototypes)Only near the end
Best forProjects where the “fun” must be discovered, such as gamesProjects with clear, fixed requirements

Advantages of RAD in game design

  • Problems and boring gameplay are found early, when they are cheaper to fix.
  • Player feedback shapes the game, so it is more likely to be enjoyable.
  • The team always has something playable to show to publishers, investors or clients.
  • It is flexible when ideas, technology or the market change.

Disadvantages of RAD

  • Without discipline, the project can keep growing (“scope creep”) and miss deadlines.
  • It needs regular involvement from testers and decision-makers.
  • Quick prototype code may be messy and need rewriting.
  • It can be harder to predict the final cost and finish date at the start.

Example

Our Scratch game tutorial builds a game step by step, testing after each part, which is a small example of iteration: A simple game! For a team project, try Group Project – Create a Game in Scratch!

Video

Game Maker’s Toolkit explains why and how to prototype a game, including quick paper prototypes, before building the full thing.

Exercise

  1. In a group, brainstorm at least 10 game ideas in 10 minutes. Choose one and describe its core concept in one sentence.
  2. Make a paper prototype of your idea and play test it with another group. Write down three changes you would make.
  3. Explain why an iterative (RAD) approach is often better than the waterfall model for making games.
  4. Give one situation where the waterfall model might be a better choice.

Syllabus link: This post is relevant to the CAPE® Animation and Game Design Syllabus, Unit 1: Fundamentals of Animation and Game Design, Module 1: Understanding Animation and Game Design – Specific Objective 21 (“identify the main stages of game design”); Specific Objective 22 (“explain the importance of RAD in game design”).

Attributions to media used in this post:

Iterative development model.svg – Aflafla1 – CC0 (via Wikimedia Commons)

Diamond Trust of London – Paper Prototype.jpg – Jason Rohrer – Public domain (via Wikimedia Commons)

WikiGameJam SF 2025 – Playtesting.jpg – Kevin Payravi – CC BY-SA 4.0 (via Wikimedia Commons)

Waterfall model.svg – Peter Kemp / Paul Smith – CC BY 3.0 (via Wikimedia Commons)

© 2026 Vedesh Kungebeharry. All rights reserved.

Ethics, Copyright and Intellectual Property in Animation and Game Design

Ethics is about deciding what is right and wrong. In animation and game design, ethical questions come up all the time: Can I use this song in my game? Is it OK to copy this character? Can I download software I cannot afford? Closely linked are the legal risks, especially around intellectual property such as copyright and patents. Note: this post is general information for learners, not legal advice. Laws differ from country to country.

Ethical, moral and social issues

Here are some common situations. Each one may seem harmless, but each is wrong and often illegal:

  • Downloading expensive software from file-sharing networks instead of buying it. This is software piracy. It takes income from the developers and can also expose your computer to malware.
  • Copying a borrowed CD or a rented DVD before returning it. You are keeping a copy you have not paid for.
  • Stripping DRM (Digital Rights Management) protection from downloaded media to make an unprotected copy. In many countries, getting around DRM is illegal even if you bought the item.
Stack of compact discs
Figure 1 – A stack of CDs. Copying a borrowed or rented disc before returning it is an example of an unethical (and often illegal) action.

Plagiarism

Plagiarism is presenting someone else’s work or ideas as your own, for example tracing another artist’s character and calling it yours, or copying code without credit. Always credit your sources and create original work. See also: Information Protection and Misuse.

The Open Movement

The Open Movement is the idea that knowledge and creative work should be freely available to use, share and improve. It includes:

  • Open source – software whose source code is published under a licence that lets anyone use, study, change and share it (for example Blender and Godot).
  • Open data – data that anyone can freely use and share.
  • Open Educational Resources (OER) – teaching and learning materials that are free to use and adapt.
  • Creative Commons (CC) licensing – licences that let creators give the public permission to share and reuse their work under certain conditions.

Open source vs public domain

These are not the same. Open source work is still protected by copyright. The owner gives permission through a licence, and you must follow its terms. Public domain work has no copyright protection (for example because the copyright has expired or the creator gave up their rights), so anyone can use it for any purpose.

Creative Commons licence elements

SymbolMeaning
BY (Attribution)You must credit the creator.
SA (ShareAlike)If you change the work, you must share your version under the same licence.
NC (NonCommercial)You cannot use the work to make money.
ND (NoDerivatives)You can share the work but not change it.
CC0The creator has given up their rights as far as the law allows, similar to public domain.

Look at the “Attributions” sections at the end of our posts. They show how to credit Creative Commons images correctly.

Intellectual property, copyright and patents

Copyright symbol
Figure 2 – The copyright symbol ©, often used in copyright notices such as “© 2026 Your Name”.

Intellectual property (IP) means creations of the mind, such as art, music, stories, software, inventions, names and logos. IP laws give owners certain exclusive rights.

TypeWhat it protectsExamples in animation and games
CopyrightOriginal creative works: art, animation, music, scripts, code. It protects the expression, not the general idea.Character artwork, a game’s source code, a soundtrack
PatentNew inventions, such as a new technical process or device.A new type of motion controller
TrademarkNames, logos and slogans that identify a brand.A studio’s logo or a game series name

Why IP matters

IP protection lets creators earn from their work, encourages new ideas and investment, and stops others from copying and selling that work without permission.

Getting protection

  • Copyright usually applies automatically as soon as an original work is created and fixed (drawn, saved or recorded). Some countries also offer optional registration. Keep dated drafts and files as proof that you made the work.
  • Patents are not automatic. You must apply to a patent office, and the invention must be new and not obvious. Patents usually last for a limited time (commonly 20 years).
  • Check your own country’s intellectual property office for local rules.

Penalties for infringement

Using protected work without permission is called infringement. Depending on the country and how serious it is, penalties can include paying damages, court orders to stop, destruction of illegal copies, fines, and in serious cases (such as large-scale piracy) prison. Online stores can also remove infringing games and videos.

Authorised use of copyrighted material

  • Get permission or buy a licence (for example stock music or asset packs).
  • Use Creative Commons or public domain material and follow the licence terms.
  • Some countries allow limited use for purposes like education, criticism or news (“fair use” or “fair dealing”). The rules are narrow, so check before relying on them.

Reducing the risks

  • Quality control – check every asset (art, sound, code, fonts) and record where it came from and what licence it uses.
  • Copyright – keep evidence of your original work, and put copyright notices on your projects.
  • Patents and trademarks – protect genuinely new inventions and your brand name where it makes sense.
  • Contracts – agree in writing who owns work created by team members and contractors.
  • Make it yourself – original art, music and code avoid most problems.

Video

This short animation from Creative Commons Aotearoa New Zealand explains the four licence elements and the six Creative Commons licences.

Exercise

  1. Explain why each of the three situations under “Ethical, moral and social issues” is wrong.
  2. What is the difference between open source and public domain?
  3. Find a Creative Commons image on Wikimedia Commons. Write a correct attribution for it and state what its licence allows.
  4. Create an asset log (a table) for a small game listing each asset, its creator, its source and its licence.

Next: The Game Design Process: Brainstorming, Rapid Prototyping, Playtesting and RAD vs Waterfall

Syllabus link: This post is relevant to the CAPE® Animation and Game Design Syllabus, Unit 1: Fundamentals of Animation and Game Design, Module 1: Understanding Animation and Game Design – Specific Objective 18 (“outline ethical issues associated with animation and game design”); Specific Objective 19 (“identify risks associated with animation and game design”); Specific Objective 20 (“develop solutions to mitigate the risks associated with animation and game design”).

Attributions to media used in this post:

CD stack.jpg – mutednarayan – CC BY-SA 2.0 (via Wikimedia Commons)

Copyright.svg – Unknown author – Public domain (via Wikimedia Commons)

© 2026 Vedesh Kungebeharry. All rights reserved.

How to Pitch and Fund an Animation or Game Project: E-Portfolios, Proposals and Funding

A great idea for an animation or game is only the start. To turn it into a real project you usually need to show your skills, pitch your idea, write a project proposal and find funding. This post walks you through each step.

E-portfolios: showing what you can do

An e-portfolio (electronic portfolio or online portfolio) is a collection of your work that you keep online. It can include images, animations, game builds, videos, sketches, blog posts and links. There are three main types:

  • Developmental (working) portfolio – shows how your skills improve over time.
  • Assessment portfolio – shows your skill in a particular area, for example for a course or exam.
  • Showcase portfolio – shows only your best work, usually for employers or clients.

Tips for a good e-portfolio

  • Put your best and most relevant work first.
  • Add a short description for each piece: what it is, the tools you used and your role (especially for team projects).
  • Show your process too, for example sketches, storyboards and early prototypes.
  • Keep it up to date and easy to navigate. Include your contact details.
  • Only include work you have the right to share (see our post on ethics and copyright).

Pitching your idea

A pitch is a short, persuasive presentation of your idea to people who might fund, publish or approve it. For an animation, a pitch focuses on the main characters, the conflict and the genre. For a game, it also explains the gameplay and what makes it special. Pitches can be very short (an “elevator pitch” lasting a minute or two) or longer presentations.

Speaker giving a presentation with slides
Figure 1 – A speaker presenting with visual aids. Good slides and clear delivery support a strong pitch.

Structure of a pitch

  1. Beginning – open with a hook to grab attention. Common hooks include an interesting statistic, a quote, a question or a short story. (Always use real, checked facts.)
  2. Middle – explain the idea: story, characters, gameplay, target audience and why it will succeed.
  3. End – say clearly what you are asking for (funding, approval, a partner) and finish with a memorable line.

Effective written and oral communication

  • Know your audience – choose your diction (choice of words) to suit them. Investors may want business details. A class may need simpler language.
  • Know your purpose – are you trying to inform, persuade, instruct or entertain?
  • Use correct grammar and clear sentences, especially in written proposals.
  • Tone and pitch of voice – speak clearly, vary your voice and sound confident.
  • Body language and movement – stand tall, make eye contact and avoid distracting habits.
  • Visual aids – use multimedia such as concept art, a short animated clip or a playable demo.
  • Equipment and room check – test the projector, sound and files before you start.
  • Edit – rehearse, time yourself and cut anything that does not help your message.

Writing a project proposal

A project proposal is a document that explains your plan and tries to convince the reader to approve or support it. A proposal commonly has five parts:

  1. Introduction – what the project is.
  2. Background – why it is needed and who it is for.
  3. Strategy – how you will make it: the team, tools and schedule (key milestones and deadlines).
  4. Budgeting or financing – what it will cost and where the money will come from.
  5. Outcome – what will be delivered and how success will be measured.

Preparing a good proposal needs research, time management and clear communication. If people will be hired, contracts should set out who does what, when, for how much, and who owns the finished work.

Our video brief post shows a similar planning document for video: The Video Brief – Professional Video Creation (Part 2).

Funding your project

Glass jar used as a savings bank with coins and notes
Figure 2 – Every project needs a realistic budget and a plan for where the money will come from.

There are two main types of funding:

  • Loans – money that must be paid back, usually with interest.
  • Grants – money given for a specific purpose that usually does not have to be paid back, but often comes with conditions and reporting.

Common sources of funding include:

SourceHow it worksThings to consider
CrowdfundingMany members of the public each give a small amount, often through a website, usually in return for rewards or early access.Needs a strong pitch and marketing. Rewards must be delivered.
Angel investorsWealthy individuals invest their own money in early-stage projects or businesses.Usually want a share of the business or profits.
Venture capitalistsFirms that invest larger amounts in businesses they believe can grow quickly.Expect high growth and may want a say in decisions.
Investors (general)People or companies who provide money in return for a share of future profits.Agree clearly on what they get in return.
Lending institutionsBanks and credit unions provide loans.Must be repaid with interest. May need security or a business plan.

Evaluating funding options

When comparing options, ask: How much money do we need? Do we have to pay it back? How much ownership or control do we give away? What are the deadlines and conditions? What happens if the project is late or fails? A realistic budget and schedule make these questions much easier to answer.

Video

Extra Credits gives practical advice on shaping a game idea, including writing a short elevator pitch and identifying your unique selling point.

Exercise

  1. Create a simple e-portfolio page (for example using a free website builder) with at least three pieces of your work and a short description of each.
  2. Write a one-minute elevator pitch for an original game or animated short. Start with a hook.
  3. Draft a one-page project proposal using the five parts above.
  4. Compare crowdfunding and a bank loan for a small indie game. Which would you choose, and why?

Next: The 12 Principles of Animation – Plus Software, Programming Languages and Basic Sound Editing

Syllabus link: This post is relevant to the CAPE® Animation and Game Design Syllabus, Unit 1: Fundamentals of Animation and Game Design, Module 1: Understanding Animation and Game Design – Specific Objective 12 (“demonstrate the use of e-portfolios and use of pitching”); Specific Objective 13 (“identify project funding opportunities for animation and game design”); Specific Objective 14 (“evaluate project funding opportunities available for animation and game design”); Specific Objective 15 (“present project proposals”).

Attributions to media used in this post:

Snjezana Kordic keynote presentation Hokkaido University.jpg – Mozel W. – CC BY-SA 4.0 (via Wikimedia Commons)

Piggy-bank-968302.jpg – stevepb – CC0 (via Wikimedia Commons)

© 2026 Vedesh Kungebeharry. All rights reserved.