Storyboarding with Camera Shots and Angles (Plus a Camera Angle Montage Exercise)

A storyboard is a series of drawings that plans every shot of an animation, or every key moment of a game, before it is made. A shot is one continuous view from the camera. Every shot has a shot size (how much we see), a camera angle (where the camera looks from) and sometimes a camera movement. Choosing these well is how you tell the story visually.

The basics of storyboarding were covered in Story Development and Scriptwriting and in Storyboards – Professional Video Creation (Part 1). This post focuses on the camera.

Anatomy of a professional storyboard panel

  • Scene and shot number – for example “Sc 2 / Sh 4”, so the team can find every shot.
  • The frame – drawn in the final screen shape (usually 16:9 widescreen).
  • Action – what the characters do.
  • Dialogue and sound – lines, sound effects (SFX) and music cues.
  • Camera notes – shot size, angle and arrows for any movement.
  • Timing and transitions – how long the shot lasts and how it joins the next one (cut, dissolve, fade).
Storyboard page with three sketched panels of mountains and a dragon, with action, dialogue and timing notes
Figure 1 – A storyboard page with a title, shot numbers, a drawing for each panel, and rows for action, dialogue, translation and timing.

Shot sizes

Shot sizeWhat it showsUse it to…
Extreme long shot (ELS) / establishing shotA whole landscape, town or building; characters are tiny or absent.Show where and when the scene takes place.
Long shot (LS) / wide shotThe full body of the character and plenty of surroundings.Show action, movement and how a character fits into the space.
Full shot / medium long shot (MLS)The whole body, or from the knees up, with some background.Show body language and groups of characters.
Medium shot (MS)From about the waist up.Conversations and everyday action.
Close-up (CU)The face or one important object.Show emotion and reactions.
Extreme close-up (ECU)A tiny detail, such as an eye or a key.Build tension or point out a clue.
Seven film stills labelled A to G showing forest scenes at different shot sizes
Figure 2 – Seven stills from the open movie Sprite Fright showing different shot sizes. Can you name each one? (Try it in the exercise below.)

Camera angles

  • Eye level – neutral and natural; the audience feels equal to the character.
  • High angle – looking down on the subject, which can make it seem small, weak or lost.
  • Low angle – looking up at the subject, which can make it seem powerful, heroic or threatening.
  • Bird’s-eye view – directly overhead, good for maps, mazes and showing patterns.
  • Worm’s-eye view – from the ground looking up, making things look huge.
  • Dutch angle (canted angle) – the camera is tilted, so the world feels uneasy or strange.
  • Over-the-shoulder (OTS) – from behind one character looking at another; common in dialogue.
  • Point of view (POV) – we see exactly what a character sees.

Camera movement

  • Pan – the camera turns left or right from a fixed spot.
  • Tilt – the camera turns up or down from a fixed spot.
  • Dolly or tracking shot – the whole camera moves towards, away from or alongside the subject.
  • Zoom – the lens changes to make the subject bigger or smaller without the camera moving.
  • Crane or pedestal – the camera rises or lowers.
Diagram of a camera on a stand turning left and right, shown by a curved red arrow
Figure 3 – A pan: the camera stays in one place and turns horizontally. On a storyboard, show this with an arrow across the panel.
Animated diagram of a dolly zoom, showing the background changing size while the subject stays the same
Figure 4 – The dolly zoom: the camera moves backwards while zooming in (or the reverse), so the subject stays the same size but the background seems to stretch. Top: what the camera sees; bottom: a plan view of the camera’s movement.

Keeping shots clear

The 180-degree rule says the camera should stay on one side of an imaginary line between two characters, so they keep facing the same way on screen. Shot-reverse-shot cuts between two characters in a conversation, often using over-the-shoulder shots.

Cameras in games

Game cameras are often controlled by the player or by code, so designers choose a camera style that suits the gameplay: first-person (seen through the character’s eyes), third-person (following behind the character), side-scrolling, top-down or isometric (a raised, angled view). Cutscenes, short non-interactive scenes, use the same shots and angles as film. For a game, storyboard the cutscenes and a few key gameplay moments, showing what the player sees and what they can do.

Example

The first scene of an animation, Nia’s Big Night, planned with six shots:

ShotShot size and angleAction and sound
1Extreme long shot, high angle (establishing)A hillside town at sunset; the sound of distant steelpans.
2Medium shot, eye levelNia rushes into the panyard, out of breath.
3Close-up, eye levelHer face drops: her pan stand is empty.
4Point of view, slow panWe see what Nia sees: the empty rows of pans.
5Low angleThe band leader appears, arms folded, looking down at her.
6Over-the-shoulderFrom behind Nia as she promises, “I’ll find it.”

Watch this Pixar in a Box video to see how Pixar artists use the camera to tell a story:

Exercise

  1. Name the shot size of each still A–G in Figure 2.
  2. Watch the opening two minutes of an animation or a game cutscene. List each shot and name its size and angle.
  3. Camera angle montage (group activity): plan the first scene of an animation story as a storyboard of six to nine panels using at least three different camera angles. Label each panel with its shot size, angle and any movement. Then act out or draw each shot, photograph them, and arrange them into a labelled montage (a grid poster, slideshow or short video).
  4. Choose a game you know and describe its camera style. Explain how it helps the player.
  5. Try an online storyboard tool, such as Storyboard That, or draw on paper and scan it.

Answers to question 1 (from the image’s description on Wikimedia Commons): A medium shot, B extreme close-up, C close-up, D extreme long shot, E long shot, F full shot, G medium long shot.

Next: Character Design for Different Genres: Shape Language, Silhouette, Colour, Props and Abilities

Syllabus link: This post is relevant to the CAPE® Animation and Game Design Syllabus, Unit 1: Fundamentals of Animation and Game Design, Module 3: Story and Character Development – Specific Objective 3 (“create a storyboard for a game or animation”).

Attributions to media used in this post:

Storyboarding template 02.jpg – Tomas Mitkus – Public domain (via Wikimedia Commons)

VocaDi-Entertainment,CameraRange.jpeg – Stills: Blender Foundation (Sprite Fright); compilation by chris 論 – CC BY 4.0 (via Wikimedia Commons)

Camera Movement – Pan.png – Nathan W. Fullerton – CC BY-SA 4.0 (via Wikimedia Commons)

Contra-zoom aka dolly zoom animation.gif – Mike1024 – Public domain (via Wikimedia Commons)

© 2026 Vedesh Kungebeharry. All rights reserved.

Story Development and Scriptwriting for Animation and Games: Storyboards, Story Arcs and Characters

Great animation and games start with a great story. Story development is the process of turning a simple idea into a complete story with characters, a plot and a setting. A script is the written version of that story: it describes what happens and what the characters say, so the whole team can build it.

Steps in story development

  1. Idea (premise) – a one-sentence summary. For example: “A shy steelpan player must win a competition to save her community centre.”
  2. Research – learn about the setting, the culture and anything else your story needs.
  3. Characters – decide who the main character (protagonist) is, what they want, and who or what stands in their way (the antagonist).
  4. Outline – list the main events from beginning to end.
  5. Script – write the scenes, actions and dialogue.
  6. Storyboard – draw the key shots in order.
  7. Review and revise – share it, get feedback and improve it.

Basic storyboarding

A storyboard is a sequence of drawings, like a comic strip, that shows each shot of an animation or each key moment of a game’s story. Under each frame you add notes about action, dialogue, sound and camera movement. Stick figures are fine: a storyboard is for planning, not for final art. See also: Storyboards – Professional Video Creation (Part 1).

Hand-drawn storyboard sheet with sketched frames and notes
Figure 1 – A hand-drawn storyboard (notes in Spanish). Each frame is labelled with its scene and shot number, and the shot type and action are written underneath.

The story arc

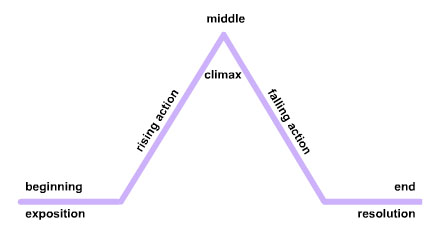
A story arc is the shape of a story from beginning to end. A common version, often drawn as a mountain, has five parts:

  1. Exposition – introduces the characters, setting and normal life.
  2. Rising action – a problem appears and things get more difficult.
  3. Climax – the most exciting or important moment, the turning point.
  4. Falling action – the results of the climax play out.
  5. Resolution – the problem is solved and a new normal begins.
Diagram of a story arc shaped like a mountain
Figure 2 – A “plot mountain” diagram of a story arc: exposition, rising action, climax, falling action and resolution.

Creative writing concepts

  • Show, don’t tell – in a visual medium, show a character’s feelings through actions and expressions instead of explaining them.
  • Conflict – every story needs a problem. No conflict, no story.
  • Theme – the big idea behind the story, such as friendship or courage.
  • Point of view and voice – whose eyes do we see the story through, and how do they speak?

Character development

Character development means creating believable characters and showing how they change during the story (their character arc). A simple character profile lists the character’s name, age, appearance, personality, goal, fear and strengths and weaknesses. Artists then draw a model sheet showing the character from different angles so everyone draws them the same way.

Character model sheet showing front, side and back views
Figure 3 – A character model sheet from the open movie Sintel, showing the same character from several angles.

Script format: animation vs games

Animation scriptGame script
Follows one fixed order of scenes, from start to finish.Can branch: the player’s choices may lead to different scenes and endings.
Written in screenplay format: scene heading (e.g. EXT. BEACH – DAY), action lines, character name and dialogue.Often written in spreadsheets or special tools, with an ID for each line, the character, the dialogue and the condition that triggers it.
Action lines describe movement and expressions in detail because everything must be drawn or animated.Includes cutscenes, in-game dialogue, short reactions (sometimes called “barks”), tutorial text and item descriptions.
One script leads to one storyboard and one finished film.Must work together with the gameplay, level design and programming.

A short animation script might look like this:

EXT. BEACH – SUNSET
MAYA (12) drags a heavy steelpan across the sand. She stops and wipes her forehead.
MAYA: One more practice. Just one.

For more on scripts, see The Video Script – Professional Video Creation (Part 4).

Example

Premise: “A young turtle must clean her polluted reef before the big storm.” Exposition: the turtle’s happy home. Rising action: plastic appears and fish get trapped. Climax: she frees the largest fish from a net as the storm arrives. Falling action: the fish help her. Resolution: the reef is clean. In the game version, the player could choose whether to fight the net or find a clever way around it, leading to two different scenes.

Watch the video below from Pixar in a Box by Khan Academy to learn more about story structure:

Exercise

  1. List the steps of story development in order.
  2. Write a one-sentence premise for a short animation, then plan it with the five parts of a story arc.
  3. Create a character profile and a simple three-view model sheet for your main character.
  4. Draw a six-frame storyboard for the opening of your story and write a half-page script for the same scene in screenplay format.

Next: Environment Design for Game Genres and Creating Digital Artwork: Scanning, Clean-Up and Free Software

Syllabus link: This post is relevant to the CAPE® Animation and Game Design Syllabus, Unit 1: Fundamentals of Animation and Game Design, Module 2: Drawing and Layout – Specific Objective 8 (“identify the steps used for story development”); Specific Objective 9 (“apply concepts to design a script for animation and game design”).

Attributions to media used in this post:

Storyboard – Iván López Fuente.jpg – Iván López Fuente – CC BY-SA 4.0 (via Wikimedia Commons)

Plotmountain.jpg – Kaede4 – Public domain (via Wikimedia Commons)

Character Sintel-model-sheet.png – David Revoy / Blender Foundation – CC BY 3.0 (via Wikimedia Commons)

© 2026 Vedesh Kungebeharry. All rights reserved.