Story Arcs, Game Scripts and Storyboards for Interactive Games

A story arc is the shape a story follows from beginning to end: it starts with a setup, builds tension through rising action, peaks at a climax and settles into a resolution. A game script is the written document that holds a game’s dialogue, scene descriptions and, unlike a film script, the choices and conditions that change what happens. A storyboard is a sequence of drawings that shows how scenes, shots or gameplay moments will look before they are built.

This lesson builds on three Unit 1 posts: Story Arcs: Five-Point, Eight-Point and Three-Act Structure, Story Development and Scriptwriting for Animation and Games and Storyboarding, Camera Angles and Shots. If you have not read them, start there. Here we focus on what changes when the audience is also a player.

Steps in creating a story arc

StepWhat happensIn a game
1. Exposition / setupIntroduce the world, the hero and what they want.An opening scene or first level that teaches movement while showing the world.
2. Catalyst (inciting incident)Something disrupts normal life and starts the adventure.The village is flooded, a friend is captured, a strange signal appears.
3. Rising actionChallenges grow; the hero gains skills, allies and obstacles.New levels, new abilities and tougher enemies or puzzles.
4. Turning pointsMajor surprises or decisions that change direction.A plot twist, a boss that reveals a secret, or a player choice that opens a new path.
5. ClimaxThe greatest challenge and highest tension.The final boss, the hardest puzzle or the key decision.
6. ResolutionLoose ends are tied up and we see the new normal.Ending cut-scene, credits, and often a post-game world to explore.
Circular diagram of the Hero’s Journey showing a call to adventure, threshold, trials and return
Figure 1 – The Hero’s Journey, a circular story pattern described by Joseph Campbell: the hero leaves the known world, faces trials in the unknown, and returns changed. Many games follow this shape. Image: Unknown author; vectorised by Slashme, Public domain, via Wikimedia Commons.

Arcs in interactive stories

In a film, the writer controls the pace. In a game, the player does. That is why game writers pair the story arc with a difficulty or intensity curve: tension rises through gameplay, with calm moments (a safe town, a cut-scene) between intense ones. Games with choices may have several arcs that share a beginning and a climax but take different routes, or even end differently.

The Extra Credits video below shows how the game Journey builds a moving story arc almost entirely through play, music and landscape, with no dialogue at all:

Writing scripts for games

Game scripts contain the same things as film scripts – scene headings, action and dialogue – but they also need:

  • Branches: different lines depending on the player’s choice (“If the player chose to help the fisherman…”).
  • Conditions and variables: notes such as “only if the player has the lantern” or “if trust ≥ 3”.
  • Barks: short lines characters say during play (“Over here!”, “I need more wood!”), often written in lists with several versions so they do not repeat.
  • Tutorial and UI text: button prompts, hints and item descriptions – these are writing too.
  • Voice direction: notes for actors about emotion and volume.

Writers often use a spreadsheet for dialogue, or special tools. Celtx handles screenplays and storyboards; Twine is a free tool for writing branching, choice-based stories; engines have dialogue plug-ins such as Ink or Yarn Spinner.

Screenshot of the Twine story map with connected boxes representing story passages
Figure 2 – Twine, a free open-source tool for writing interactive, branching stories. Each box is a passage and the arrows show the choices that link them. Image: AlexRosenthal, CC0, via Wikimedia Commons.

Sample game script format

SCENE 3 – HARBOUR AT DUSK
Rain begins. Boats knock against the pier.

MARISOL (worried): The storm is early. Grandpa’s boat is still out.

PLAYER CHOICE:
[A] "I’ll take the lighthouse path." -> SCENE 4A (sets courage +1)
[B] "Let’s ask the harbour master." -> SCENE 4B (sets trust +1)

IF player has LANTERN:
MARISOL: Good – light it at the top. He’ll see it.
ELSE:
MARISOL: We need light. Check Mr. Joseph’s shop.

BARKS (Marisol, while following): "Careful, it’s slippery!" / "Hurry!" / "I can see the light!"

Storyboarding for games

Game storyboards are used for cut-scenes (like film storyboards) and for gameplay sequences, where each panel shows what the player sees and does. Gameplay boards often include arrows for player movement, notes on the controls being used and small drawings of the HUD. Keep each panel simple: a clear drawing, a camera note (wide shot, close-up, over-the-shoulder) and a caption of the action or dialogue.

Storyboard sheet with rows of sketched panels and handwritten notes
Figure 3 – A storyboard page: numbered panels with simple drawings and notes underneath each one. Game storyboards add notes about player actions and camera control. Image: Tom Ray (tmray02 on Flickr), CC BY-SA 2.0, via Wikimedia Commons.

Example

A student plans a short game, Lantern Night, about a girl guiding her grandfather’s boat home during a storm.

  • Setup: a calm harbour; the player learns to walk and talk to villagers.
  • Catalyst: the storm arrives early and Grandpa’s boat is missing.
  • Rising action: the player finds a lantern, crosses a slippery cliff path and fixes the lighthouse gears.
  • Turning point: the lighthouse bulb is broken; the player must choose to use the lantern as the light.
  • Climax: in a timed sequence, the player keeps the flame alive against wind gusts while the boat approaches.
  • Resolution: the boat reaches the pier; villagers celebrate, and the lighthouse becomes the game’s save point.

She writes the script scene by scene (like the sample above) and draws a nine-panel storyboard of the climax: panel 1 wide shot of the storm, panel 2 close-up of the flame flickering, panel 3 the player pressing a button to shield it, and so on.

Exercise

  1. List the six steps of a story arc and describe each one for a game you have played.
  2. Write a one-page game script for a scene with at least one player choice, one condition and three barks.
  3. Draw a six- to nine-panel storyboard for either a cut-scene or a short gameplay sequence from your script. Add camera and control notes under each panel.
  4. Try Twine (free at twinery.org) and turn your script into a playable branching story with at least two endings.

Next: How to Pitch an Interactive Game and Design for Your Target Audience (Demographics)

Syllabus link: This post is relevant to the CAPE® Animation and Game Design Syllabus, Unit 2: Interactive Design and Game Development, Module 1: Introduction to Interactive Design – Specific Objective 11 (“identify the steps involved in creating a story arc”); Specific Objective 12 (“employ the knowledge of writing scripts for games”); Specific Objective 13 (“create a storyboard”).

Attributions to media used in this post:

Heroesjourney.svg – Unknown author; vectorised by Slashme – Public domain (via Wikimedia Commons)

Twine 2.9.2 screenshot.png – AlexRosenthal – CC0 (via Wikimedia Commons)

Storyboard for The Radio Adventures of Dr. Floyd.jpg – Tom Ray (tmray02 on Flickr) – CC BY-SA 2.0 (via Wikimedia Commons)

© 2026 Vedesh Kungebeharry. All rights reserved.

Story Arcs Explained: Five-Point, Eight-Point and Three-Act Structures for Games and Animation

A story arc is the path a story follows from its beginning, through rising tension, to its end. A narrative is the story as it is told to the audience, and storytelling principles are the techniques that keep people interested, such as conflict, cause and effect, and change. Writers use a few well-known story structures as blueprints for their arcs.

In Story Development and Scriptwriting we met the basic “plot mountain”. This post compares three structures in practice, the five-point arc, the eight-point arc and the three-act structure, and shows how to use them to write a narrative for both an animation and a game.

The five-point story arc

The five-point arc is based on the pyramid the German writer Gustav Freytag used in 1863 to describe dramatic plays. Using the folk tale Jack and the Beanstalk:

  1. Exposition – Jack and his mother are poor and must sell their cow.
  2. Rising action – Jack trades the cow for magic beans, a giant beanstalk grows, and he climbs into the giant’s castle.
  3. Climax – the giant chases Jack down the beanstalk.
  4. Falling action – Jack chops down the beanstalk and the giant can no longer follow him.
  5. Resolution – Jack and his mother live comfortably with the treasure he brought back.
Hand-drawn diagram of Freytag’s pyramid with a rising line, a peak and a falling line
Figure 1 – A simple drawing of Freytag’s pyramid: introduction, rising action, climax, a falling slope (labelled “resolution” here, the falling action) and the ending of the story.

The eight-point story arc

The eight-point arc, described by the author Nigel Watts, breaks the story into smaller steps. It is especially useful for planning scenes, episodes and levels.

PointWhat happensJack and the Beanstalk
1. StasisEveryday life before the story starts.Jack and his mother are poor.
2. TriggerSomething beyond the hero’s control starts the story.They must sell the cow; Jack swaps it for beans.
3. QuestThe hero sets out to achieve a goal.Jack climbs the beanstalk to find a fortune.
4. SurpriseUnexpected events and obstacles.A giant lives there and can smell him.
5. Critical choiceThe hero makes a difficult decision that shows who they are.Jack chooses to go back up for more treasure.
6. ClimaxThe highest point of tension.The giant chases Jack down the beanstalk.
7. ReversalThe result of the choice; the hero’s situation changes.Jack chops down the beanstalk; the danger is over.
8. ResolutionA new everyday life.Jack and his mother are safe and no longer poor.

The three-act structure

Most films, and many games, use three acts:

  • Act 1: Setup (about the first quarter) – introduce the hero, the world and the inciting incident. It ends at plot point 1, when the hero commits to the goal.
  • Act 2: Confrontation (about half) – obstacles get harder. A midpoint twist raises the stakes. It ends at plot point 2, often the lowest moment.
  • Act 3: Resolution (the last quarter) – the climax, where the conflict is decided, and a short ending.
Diagram dividing a story line into Act 1, Act 2 and Act 3 with marked plot points
Figure 2 – The three-act structure: setup, confrontation and resolution, with the inciting incident, plot points, midpoint and climax.
Graph showing tension rising across three acts and dropping after the climax
Figure 3 – Tension usually rises through the three acts and peaks at the climax near the end.

How the three structures fit together

Three-actFive-pointEight-point
Act 1: SetupExpositionStasis, Trigger
Act 2: ConfrontationRising actionQuest, Surprise, Critical choice
Act 3: ResolutionClimax, Falling action, ResolutionClimax, Reversal, Resolution

Storytelling principles that make arcs work

  • Cause and effect – link events with “but” and “therefore”, not “and then”. Each event should cause the next.
  • Stakes – make it clear what the hero will lose if they fail.
  • Change – the hero, or their world, should be different at the end.
  • Set-up and pay-off – if something important happens in Act 3, plant a hint of it in Act 1.
  • Pacing – alternate tense moments with quieter ones so the audience can breathe.

Writing a narrative for an animation and for a game

An animation narrative is linear: the audience watches the same events, in the same order and at the same speed, every time. A game narrative must share control with the player, so writers choose how much freedom to give:

  • Linear – one main path through levels, with the story told between them.
  • Branching – player choices lead to different scenes or endings. The eight-point “critical choice” becomes a real choice.
  • Open or emergent – the player explores freely and discovers the story through places, objects and characters (environmental storytelling).

A simple way to map a game onto three acts is: Act 1 = the tutorial levels, Act 2 = the main levels with a midpoint twist or boss, Act 3 = the final level and ending. See What Is a Level in Game Design? for planning those levels.

Example

Idea: Nia, a young steelpan player, discovers that the tenor pan she needs for the Panorama competition has gone missing from the panyard.

Animation narrative (three acts): Act 1 – Nia practises every evening; two days before the competition her pan vanishes (inciting incident) and she promises the band she will find it (plot point 1). Act 2 – she follows clues around the neighbourhood, but each lead fails; at the midpoint she learns her rival borrowed it to secretly repair a dent; her anger peaks when the rival will not return it in time (plot point 2). Act 3 – on competition night Nia chooses to share the stage and a borrowed pan with her rival, and together they help the band play its best performance ever.

Game narrative: Level 1 (tutorial) teaches rhythm-tapping in the panyard. Levels 2–3 are search levels in the neighbourhood, where finding clues unlocks new songs. After the midpoint reveal, the player makes a critical choice: confront the rival or team up. Each choice leads to a different final level and one of two endings.

Watch the video below for a clear walkthrough of the eight-point story arc:

Exercise

  1. Choose a well-known story (a fairy tale, folk tale or film) and map it onto the five-point arc and the eight-point arc.
  2. In a group, take a culturally relevant scenario, such as a lost Carnival costume, a village festival or a hurricane, and plan its story arc on a large sheet of paper.
  3. Write a three-act narrative of about 300 words for a short animation based on your scenario. Label the inciting incident, midpoint and climax.
  4. Rewrite the same story as a game narrative: plan three to five levels, one critical choice and two possible endings.
  5. Start a story journal. Each week, note a story you watched, read or played and identify its arc.

Next: Storyboarding with Camera Shots and Angles (Plus a Camera Angle Montage Exercise)

Syllabus link: This post is relevant to the CAPE® Animation and Game Design Syllabus, Unit 1: Fundamentals of Animation and Game Design, Module 3: Story and Character Development – Specific Objective 2 (“write a narrative for a game and an animation based on story arcs and storytelling principles”).

Attributions to media used in this post:

Freytag Pyramid.png – Kubrapika – CC BY-SA 4.0 (via Wikimedia Commons)

Three-act structure.svg – Puikstekend – CC BY-SA 4.0 (via Wikimedia Commons)

Tension of three act structure.png – UfofVincent – CC BY-SA 4.0 (via Wikimedia Commons)

© 2026 Vedesh Kungebeharry. All rights reserved.

Story Development and Scriptwriting for Animation and Games: Storyboards, Story Arcs and Characters

Great animation and games start with a great story. Story development is the process of turning a simple idea into a complete story with characters, a plot and a setting. A script is the written version of that story: it describes what happens and what the characters say, so the whole team can build it.

Steps in story development

  1. Idea (premise) – a one-sentence summary. For example: “A shy steelpan player must win a competition to save her community centre.”
  2. Research – learn about the setting, the culture and anything else your story needs.
  3. Characters – decide who the main character (protagonist) is, what they want, and who or what stands in their way (the antagonist).
  4. Outline – list the main events from beginning to end.
  5. Script – write the scenes, actions and dialogue.
  6. Storyboard – draw the key shots in order.
  7. Review and revise – share it, get feedback and improve it.

Basic storyboarding

A storyboard is a sequence of drawings, like a comic strip, that shows each shot of an animation or each key moment of a game’s story. Under each frame you add notes about action, dialogue, sound and camera movement. Stick figures are fine: a storyboard is for planning, not for final art. See also: Storyboards – Professional Video Creation (Part 1).

Hand-drawn storyboard sheet with sketched frames and notes
Figure 1 – A hand-drawn storyboard (notes in Spanish). Each frame is labelled with its scene and shot number, and the shot type and action are written underneath.

The story arc

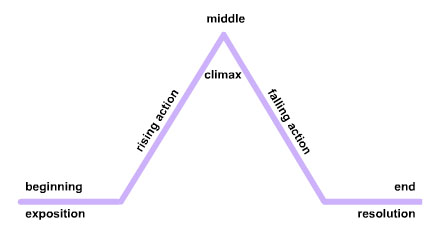
A story arc is the shape of a story from beginning to end. A common version, often drawn as a mountain, has five parts:

  1. Exposition – introduces the characters, setting and normal life.
  2. Rising action – a problem appears and things get more difficult.
  3. Climax – the most exciting or important moment, the turning point.
  4. Falling action – the results of the climax play out.
  5. Resolution – the problem is solved and a new normal begins.
Diagram of a story arc shaped like a mountain
Figure 2 – A “plot mountain” diagram of a story arc: exposition, rising action, climax, falling action and resolution.

Creative writing concepts

  • Show, don’t tell – in a visual medium, show a character’s feelings through actions and expressions instead of explaining them.
  • Conflict – every story needs a problem. No conflict, no story.
  • Theme – the big idea behind the story, such as friendship or courage.
  • Point of view and voice – whose eyes do we see the story through, and how do they speak?

Character development

Character development means creating believable characters and showing how they change during the story (their character arc). A simple character profile lists the character’s name, age, appearance, personality, goal, fear and strengths and weaknesses. Artists then draw a model sheet showing the character from different angles so everyone draws them the same way.

Character model sheet showing front, side and back views
Figure 3 – A character model sheet from the open movie Sintel, showing the same character from several angles.

Script format: animation vs games

Animation scriptGame script
Follows one fixed order of scenes, from start to finish.Can branch: the player’s choices may lead to different scenes and endings.
Written in screenplay format: scene heading (e.g. EXT. BEACH – DAY), action lines, character name and dialogue.Often written in spreadsheets or special tools, with an ID for each line, the character, the dialogue and the condition that triggers it.
Action lines describe movement and expressions in detail because everything must be drawn or animated.Includes cutscenes, in-game dialogue, short reactions (sometimes called “barks”), tutorial text and item descriptions.
One script leads to one storyboard and one finished film.Must work together with the gameplay, level design and programming.

A short animation script might look like this:

EXT. BEACH – SUNSET
MAYA (12) drags a heavy steelpan across the sand. She stops and wipes her forehead.
MAYA: One more practice. Just one.

For more on scripts, see The Video Script – Professional Video Creation (Part 4).

Example

Premise: “A young turtle must clean her polluted reef before the big storm.” Exposition: the turtle’s happy home. Rising action: plastic appears and fish get trapped. Climax: she frees the largest fish from a net as the storm arrives. Falling action: the fish help her. Resolution: the reef is clean. In the game version, the player could choose whether to fight the net or find a clever way around it, leading to two different scenes.

Watch the video below from Pixar in a Box by Khan Academy to learn more about story structure:

Exercise

  1. List the steps of story development in order.
  2. Write a one-sentence premise for a short animation, then plan it with the five parts of a story arc.
  3. Create a character profile and a simple three-view model sheet for your main character.
  4. Draw a six-frame storyboard for the opening of your story and write a half-page script for the same scene in screenplay format.

Next: Environment Design for Game Genres and Creating Digital Artwork: Scanning, Clean-Up and Free Software

Syllabus link: This post is relevant to the CAPE® Animation and Game Design Syllabus, Unit 1: Fundamentals of Animation and Game Design, Module 2: Drawing and Layout – Specific Objective 8 (“identify the steps used for story development”); Specific Objective 9 (“apply concepts to design a script for animation and game design”).

Attributions to media used in this post:

Storyboard – Iván López Fuente.jpg – Iván López Fuente – CC BY-SA 4.0 (via Wikimedia Commons)

Plotmountain.jpg – Kaede4 – Public domain (via Wikimedia Commons)

Character Sintel-model-sheet.png – David Revoy / Blender Foundation – CC BY 3.0 (via Wikimedia Commons)

© 2026 Vedesh Kungebeharry. All rights reserved.