How to Animate a Basic Walk Cycle for Games

A walk cycle is a short series of frames showing a character taking two steps – one with each foot – that loops seamlessly, so the character appears to walk continuously. In games, walk cycles are among the most important animations, because players watch their character walk for hours. A basic walk cycle is built from four key poses: contact, down, passing and up.

Walk cycles use the timing and spacing skills from Persistence of Vision, Simple 2D Movement and the Bouncing Ball Timing Exercise – in fact, the body’s up-and-down motion behaves a bit like a gentle bouncing ball.

The four key poses

PoseWhat happensTips
ContactThe front heel touches the ground and the back toe is about to leave it. The legs are furthest apart.This pose shows the stride length. Arms are opposite to legs: left leg forward, right arm forward.
DownThe front leg bends to absorb the weight; the body is at its lowest point.Shows weight. A heavy character sinks more.
PassingThe back leg swings past the standing leg; the body rises through the middle.The free foot lifts to clear the ground.
UpThe standing leg pushes up onto the toe; the body is at its highest point.Leads into the next contact with the other foot.

After the four poses for one step, the same poses are repeated with the opposite leg and arm to complete the cycle. The last frame must lead smoothly back into the first so the loop has no jump.

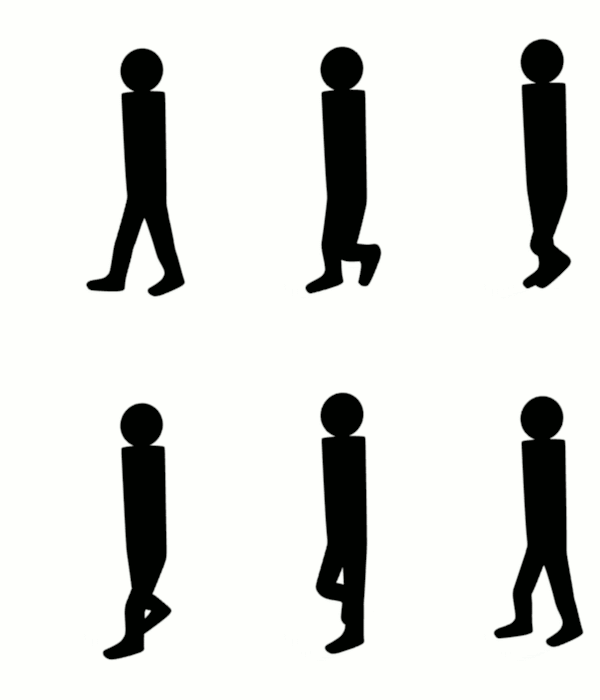
Animated black-and-white cartoon character walking in profile
Figure 1 – A simple four-frame walk cycle in profile. Even with very few drawings, the loop reads clearly as walking. Image: Ajay Karat, CC BY 3.0, via Wikimedia Commons.

Timing a walk

  • At 24 fps, a normal walk takes about 12 frames per step (24 frames for the full cycle), which is roughly two steps per second.
  • A quick, cheerful walk might use 8 frames per step; a slow, tired walk 16 or more.
  • Game sprites often use 4, 6 or 8 frames for the whole cycle to save art time and memory.
  • Personality comes from variation: a bouncy walk has big up-and-down motion; a sneaky walk is low with slow, careful steps; a proud walk leads with the chest.

Other body parts

  • Hips rise and fall (lowest on the down pose, highest on the up pose) and tilt slightly from side to side.
  • Shoulders twist opposite to the hips.
  • Arms swing opposite to the legs, following arcs, with a slight delay (follow-through).
  • Head bobs with the body; hair, clothes and tails trail behind (overlapping action).
Animated black silhouette of a figure walking in a steady loop
Figure 2 – A 3D walk cycle created in Blender. The same four key poses and timing apply whether you draw by hand or animate a 3D rig. Image: SoylentGreen, CC BY-SA 3.0, via Wikimedia Commons.

Walk cycles in games

Game walk cycles have a few special requirements:

  • In-place animation: the character walks on the spot, and the game code moves it through the world. The animation speed must match the movement speed, or feet appear to slide.
  • Root motion: in some 3D engines, the animation itself moves the character, keeping feet planted perfectly.
  • Sprite sheets: 2D frames are arranged in a grid image that the engine plays in order.
  • Transitions and blending: the walk must blend smoothly into idle, run and jump animations. Engines use state machines to switch between them.
  • Directions: top-down and isometric games need walk cycles for four or eight directions.

In this project from the Scratch Team, a sprite switches through walking costumes in a loop. Click “See inside” to see how the cycle and the movement are coded, then remix it with your own drawings:

Alan Becker’s tutorial breaks down walk cycles pose by pose:

Common walk cycle mistakes

  • Arms and legs on the same side moving together. Remember: left leg forward means right arm forward.
  • No up-and-down motion. Without the down and up poses, the character glides like it is on wheels.
  • A “pop” at the loop point. The last frame should be one step before the first frame, not a copy of it, or the loop will stutter.
  • Feet sliding. The planted foot should stay fixed to the ground while the body moves over it.
  • Stiff arms. Let the elbows bend slightly and the hands trail behind on arcs.

Example

For a side-scrolling game, a student animates an 8-frame walk cycle for a young fisher character: frame 1 contact (left foot forward), frame 2 down, frame 3 passing, frame 4 up, then frames 5–8 repeat the poses with the right foot forward. He exports the frames as a sprite sheet, sets the animation to play at 10 frames per second, and adjusts the character’s movement speed in the game until the feet no longer slide across the boardwalk. To show personality, he adds a slight bounce and lets her fishing hat bob one frame behind the head.

Exercise

  1. Draw the four key poses (contact, down, passing, up) for one step in profile, using stick figures or a simple character.
  2. Complete an 8- or 12-frame walk cycle that loops smoothly. Check it with onion skinning.
  3. Animate two walks with different personalities (for example happy and tired). Describe how you changed timing and poses.
  4. Put your walk cycle into Scratch or a game engine and match the movement speed so the feet do not slide.

Next: Stop-Motion Animation: Wire Bending, Armatures and Building Models for Scenes

Syllabus link: This post is relevant to the CAPE® Animation and Game Design Syllabus, Unit 2: Interactive Design and Game Development, Module 3: Animation for Games – Specific Objective 10 (“create basic walk cycles”).

Attributions to media used in this post:

4-frame-walk-cycle.gif – Ajay Karat – CC BY 3.0 (via Wikimedia Commons)

Blender3D NormalWalkCycle.gif – SoylentGreen – CC BY-SA 3.0 (via Wikimedia Commons)

© 2026 Vedesh Kungebeharry. All rights reserved.

Persistence of Vision, Simple 2D Movement and the Bouncing Ball Timing Exercise

Persistence of vision is the traditional name for the way our eyes and brain hold on to an image for a fraction of a second after it disappears, so that a rapid series of still pictures blends into what looks like continuous motion. Animation depends on this effect. Simple 2D animation movements are short sequences of drawings that move an object from one position to another, and the bouncing ball is the classic first exercise for learning timing – the number of frames an action takes – and spacing – how far the object moves between frames.

The twelve principles of animation were introduced in The 12 Principles of Animation, Tools and Sound Editing and early optical toys in History of Animation and Video Games. This lesson turns that knowledge into practice.

Persistence of vision

When images are shown quickly enough – roughly 10–12 or more per second – we stop seeing separate pictures and see movement. Nineteenth-century optical toys such as the thaumatrope, phenakistiscope and zoetrope used this to create the first moving images. Scientists today explain apparent motion mainly through the brain’s processing (sometimes called the phi phenomenon or beta movement) rather than the eye simply “holding” images, but “persistence of vision” remains the standard term in animation and in the CAPE syllabus.

Spinning circular disc with small drawings of running rats around its edge
Figure 1 – An animated phenakistiscope disc from 1833. Each slot shows a slightly different drawing; spun quickly, the separate images blend into running animals. Image: Thomas Mann Baynes (1833); animation by Basile Morin, Public domain, via Wikimedia Commons.

Frame rates

  • 24 frames per second (fps) is the film standard. Animators often draw on twos (each drawing held for two frames, 12 drawings per second).
  • Games usually run at 30 or 60 fps, but individual sprite animations may use far fewer drawings (6–12 per second) for a stylised look.
  • The fewer drawings, the choppier the motion; the more drawings, the smoother – but the more work.

Simple 2D animation movements

Every 2D movement is built from keyframes (the main poses or positions) and in-betweens (the drawings that connect them). Animators work in two ways: straight ahead (drawing frame 1, 2, 3 in order, good for fluid, unpredictable action like fire) and pose to pose (drawing the keys first, then filling in-betweens, good for planned action). Simple first movements include:

  • A ball rolling across the screen at constant speed (even spacing).
  • A ball starting slowly, speeding up and slowing down (slow in and slow out: close spacing near the keys, wide spacing in the middle).
  • A pendulum swinging along an arc.
  • A leaf falling in a gentle S-curve.

The bouncing ball: timing in action

The bouncing ball teaches most of the principles at once: timing, spacing, slow in and slow out, arcs and squash and stretch. Gravity makes the ball move slowly at the top of each bounce and fastest just before it hits the ground.

Animated grey ball bouncing with realistic slowing at the top and squash at the bottom
Figure 2 – A well-timed bouncing ball: it slows near the top of each arc, speeds up as it falls, and squashes on contact with the ground. Image: AndyD at English Wikibooks, CC BY-SA 2.5, via Wikimedia Commons.
Animated grey ball bouncing at a constant speed that looks unnatural
Figure 3 – A poorly timed bouncing ball with even spacing. Without slow in and slow out it looks mechanical and weightless – compare it with the previous figure. Image: AndyD at English Wikibooks, CC BY-SA 3.0, via Wikimedia Commons.

Step by step

  1. Plan the path. Lightly draw the ground line and a series of arcs, each lower and shorter than the last, as the ball loses energy.
  2. Draw the keys: the ball on the ground (contact) and at the top of each arc.
  3. Plan the timing. At 24 fps, a first bounce might take about 12–16 frames from contact to contact; later bounces get quicker.
  4. Space the in-betweens. Place drawings close together near the top of the arc (slow) and far apart near the ground (fast). A timing chart – a small ruler-like diagram showing where each in-between falls – helps you plan.
  5. Add squash and stretch. Stretch the ball slightly along its path in the fast frames just before and after contact; squash it flat on the contact frame. Keep the volume the same.
  6. Play it back, check the rhythm and adjust. Then try balls of different materials: a bowling ball (heavy, few bounces, little squash) and a beach ball (light, floaty, many bounces).
Long-exposure photo of a ball bouncing, showing multiple images along decreasing arcs
Figure 4 – A strobe photograph of a real bouncing ball. The images are close together at the top of each arc and far apart near the ground – exactly the spacing animators copy. Image: Michael Maggs; edit by Richard Bartz, CC BY-SA 3.0, via Wikimedia Commons.

This TED-Ed lesson explains timing and spacing with clear examples, including the bouncing ball:

Tools

You can animate a bouncing ball on paper with a flip book, in free programs such as Krita, OpenToonz, Pencil2D or Blender’s Grease Pencil, in Scratch by switching costumes and gliding, or in a game engine using keyframes. Use onion skinning (seeing faint previous and next frames) to judge spacing.

Example

A student animates a rubber ball at 24 fps. Frame 1: contact, squashed. Frames 2–7: rising, stretched at first and then round, with spacing getting closer. Frame 8: the top of the arc, round and barely moving. Frames 9–14: falling, spacing getting wider, stretched on frame 14. Frame 15: contact and squash again. The second bounce is lower and takes 11 frames; the third takes 8. For comparison, he animates a bowling ball that bounces once, only a few centimetres, with almost no squash – and viewers immediately feel the difference in weight.

Exercise

  1. Define persistence of vision in your own words and name two optical toys that use it.
  2. Animate a simple 2D movement: a ball rolling with slow in and slow out, or a pendulum on an arc.
  3. Animate a bouncing ball with at least three bounces, applying timing, spacing, arcs and squash and stretch. Include your timing chart.
  4. Animate two more balls of different materials (heavy and light) and explain how you changed the timing.

Next: How to Animate a Basic Walk Cycle for Games

Syllabus link: This post is relevant to the CAPE® Animation and Game Design Syllabus, Unit 2: Interactive Design and Game Development, Module 3: Animation for Games – Specific Objective 8 (“create simple 2D animation movements”); Specific Objective 9 (“create Bouncing Ball applying timing principle”); Specific Objective 11 (“define the persistence of vision”).

Attributions to media used in this post:

Animated phenakistiscope disc – Running rats Fantascope by Thomas Mann Baynes 1833.gif – Thomas Mann Baynes (1833); animation by Basile Morin – Public domain (via Wikimedia Commons)

Bouncewiki.gif – AndyD at English Wikibooks – CC BY-SA 2.5 (via Wikimedia Commons)

Bouncebadwiki.gif – AndyD at English Wikibooks – CC BY-SA 3.0 (via Wikimedia Commons)

Bouncing ball strobe edit.jpg – Michael Maggs; edit by Richard Bartz – CC BY-SA 3.0 (via Wikimedia Commons)

© 2026 Vedesh Kungebeharry. All rights reserved.